TWiki> Gunwiki Web>ArticleIndexByGun>RefArFamily>ProcInstallReceiverRug (01 Oct 2008, SeanNewton)
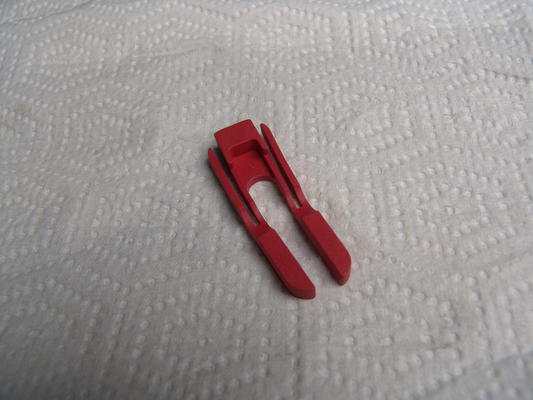
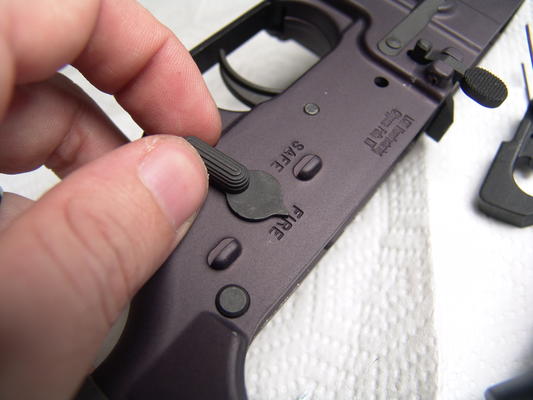
Reviewing and Installing the DPMS Receiver RugAfter my stuck primer experience, I've been keeping primer jams in mind when shooting my AR's. It's not like I could actually do anything to change matters much, but I was making a point of carrying along suitable tools to remove stuck primers from my action. All the while, I was acutely aware that if I were actually in a role where I would be endangered by such a jam, there didn't seem to be much that could be done about it. It was with a bit of surprise, then, that I spotted the DPMS Receiver Rug a month or so ago and wrote to DPMS for a review sample.First Look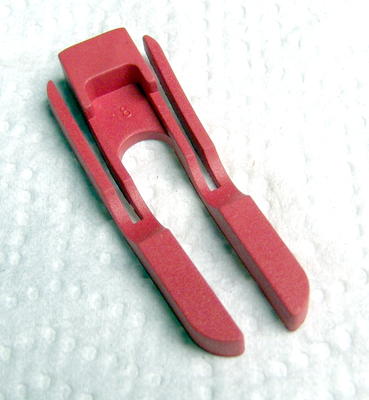 First off, this is what the receiver rug really looks like. Most commercial websites use the side view only, which doesn't give you a chance to figure out how it works, so here you go. On an unrelated note, in color it looks very much like the DPMS Accu-Wedge, which I've also written a how-to on installing. The finish is less glossy, however - I'm not sure what difference this makes. First off, this is what the receiver rug really looks like. Most commercial websites use the side view only, which doesn't give you a chance to figure out how it works, so here you go. On an unrelated note, in color it looks very much like the DPMS Accu-Wedge, which I've also written a how-to on installing. The finish is less glossy, however - I'm not sure what difference this makes.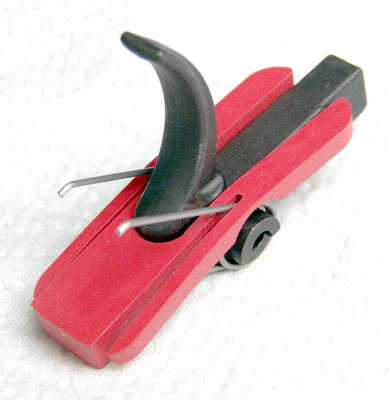 Mounted to a trigger, it looks more like this. Notice the slits for the trigger return spring? That coverage is what tends to prevent debris from getting underneath the front part of your trigger, which will jam it in the cocked position and leave it unable to fire. And the two longer "ears" that fit on either side of the long rear part of the trigger? Those keep debris from getting underneath the rear part and jamming the trigger in the rearmost position. The rear ears are also where the tightest fit is found. I strongly suspect that most of the change in trigger pull comes from back here. Notice the scooped-out contours directly underneath where the pivot pins rest? I suspect that in the first-generation rug (which didn't have those), the trigger pull was a bit stiffer. Mounted to a trigger, it looks more like this. Notice the slits for the trigger return spring? That coverage is what tends to prevent debris from getting underneath the front part of your trigger, which will jam it in the cocked position and leave it unable to fire. And the two longer "ears" that fit on either side of the long rear part of the trigger? Those keep debris from getting underneath the rear part and jamming the trigger in the rearmost position. The rear ears are also where the tightest fit is found. I strongly suspect that most of the change in trigger pull comes from back here. Notice the scooped-out contours directly underneath where the pivot pins rest? I suspect that in the first-generation rug (which didn't have those), the trigger pull was a bit stiffer.How the Receiver Rug Changed ThingsOnce I got it installed, I do have to say that the Receiver Rug did everything it was supposed to do where debris was concerned. As a control, I manually reproduced the primer jam I'd had earlier in a different AR receiver (also equipped with the stock trigger, but NOT with the receiver rug) using inert, expended primers.Jamming Experiment DescribedI found that it was fairly easy to create a jam in an AR-15 receiver with the stock fire control group installed and no Receiver Rug, by dropping four primers underneath the hammer's pivot pin (I used two per side) with the receiver angled slightly down. I then angled the receiver slightly upwards and gave it a single shake to relocate the primers slightly rearward, underneath the forward part of the trigger (thus jamming the FCG, preventing the trigger from travelling downwards). I used four primers simply because it increased the chance of one primer getting into the right spot to block the trigger. At any rate, about 80% of the time this experiment resulted in at least one primer being wedged firmly underneath the forward part of the trigger and preventing it from being pulled. My theory as to why it took actual effort to cause a jam in a controlled environment, while jams seem more frequent in real life when primers are loose, is that the recoil action serves to kick the primer to the front and then give it that slight rearward shake (which lodges it under the front of the trigger) as the bolt goes back into battery. Another possibility is that primers in a shooting situation are typically mangled by the weapon's action and thus fit into places easier, whereas intact primers are larger and thus take more effort to create a jam with.Thoughts on JammingAt any rate, once I had a reliable means of reproducing primer jams, I repeated the experiment outlined above in the rifle which had had the Receiver Rug installed in it. I must say that I had one time where I thought I'd managed to get a jam, but I'd just failed to pull the hammer back all the way. I repeated the experiment ten times without managing to wedge a single primer underneath the trigger. I also tried a few other tricks (shoving primers towards the trigger's front with a pick, the rear, etc) and was unable to reproduce a jam. I tried pushing primers pretty much anywhere I could think of, without actually moving the receiver rug itself. I have to say that I'm pretty confident the Receiver Rug will actually function as advertised and will almost completely prevent primer-related FCG lockups. The only thing I think the Receiver Rug may increase the rate of jamming with is debris like sand, etc. The issue there is that with the receiver rug mostly blocking sediment from freely circulating out and down through the trigger hole, the only thing it can do is pile up inside the action. This can be addressed with cleaning, however. Basically, you have to ask yourself whether you're more worried about something small getting into your FCG and stopping things, or about having enough sand pile up inside your AR in-between cleanings to actually make it an issue. I suspect that the sand scenario is pretty remote. The one plausible enhanced risk I've found, upon some internet research, was that if the trigger doesn't get hung up by debris, the debris may make its way into the rest of the action. A jammed bolt or bolt carrier actually does sound particularly nasty to me. However, one is left wondering whether these folks intend to shoot their rifles upside-down a lot or something, given that there's still space for the primers to sit in the FCG area - they're just kept out of the part where they'd hang up the FCG. I imagine that with the receiver rug in place, you could have debris kicking around the bottom of the receiver harmlessly until your next cleaning. I'm almost tempted to put a few primer anvils into my range bag to stick in my AR's action the next time I go to the range, and see if my theory is correct (that the debris will stay put until the rifle's up for cleaning). Should I actually choose to be this foolish, I will update this article after the fact.How it Affected Trigger PullNext, on the subject of trigger pull, my AR's trigger pull measured 6lbs 6oz (average from 5 pulls) immediately before installing the rug. After installing the rug, trigger pull climbed to 8lbs 2oz (average from around 7-8 pulls). The pull was definitely harder, and felt a little bit disconnected. It seemed to remove the takeup which you feel on a stock AR trigger just before it breaks. That may be a good thing if you're trying to get over a flinch, or a bad thing if you like to be able to feel exactly when the trigger's going to break. On a side note, I did try the trigger a hundred or so times, and the pull didn't seem to noticeably change. It's possible that it might wear in a little over time - I didn't try adding CLP to the trigger area, so it may get easier after it's marinated a little. One other option to reduce the trigger pull penalty would be to try trimming some of the material towards the rear of the rug, which wouldn't affect your protection from primer jams in the front. The rear area seems to have a bit of extra material anyway.InstallationFirst off, you must remove not just the hammer and trigger, but the safety as well. I'm used to working my way around having to remove the safety, but in this case DPMS's manuals are correct: you have to take out the safety. The reason for this is that the receiver rug needs to go in vertically, pre-installed on the trigger. The orientation of the rug is crucial too.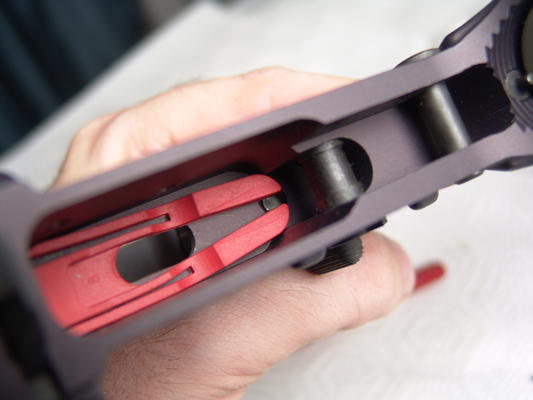 Here's why you can't install the receiver rug first. Notice how the receiver rug's dimensions are ever so slightly larger than the space available in the receiver? I've tested it in Lauer Custom Weapons, CMMG, and Stag Arms receivers - all of them had the same issue. It's possible that DPMS's own in-house receivers may have slightly more clearance. However, this can be worked around just fine as long as you install the receiver rug according to these instructions. Here's why you can't install the receiver rug first. Notice how the receiver rug's dimensions are ever so slightly larger than the space available in the receiver? I've tested it in Lauer Custom Weapons, CMMG, and Stag Arms receivers - all of them had the same issue. It's possible that DPMS's own in-house receivers may have slightly more clearance. However, this can be worked around just fine as long as you install the receiver rug according to these instructions.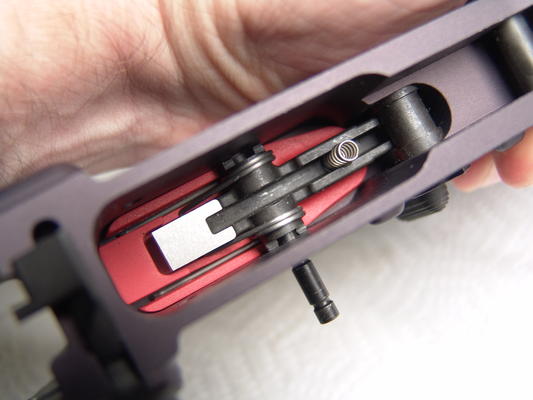 Here's the failure mode of a receiver rug which hasn't had the ears "tucked in" like I'll show you farther on in this guide. Because the rear "ears" end up underneath the rear of the trigger, it's firmly wedged and is prevented from travelling. A real he-man type may be able to pull the trigger hard enough to get things into position from this state, but it would be likely to damage the receiver rug and possibly bend the pivot pin in the process. It's better to just remove the safety and install the whole thing top-down. Here's the failure mode of a receiver rug which hasn't had the ears "tucked in" like I'll show you farther on in this guide. Because the rear "ears" end up underneath the rear of the trigger, it's firmly wedged and is prevented from travelling. A real he-man type may be able to pull the trigger hard enough to get things into position from this state, but it would be likely to damage the receiver rug and possibly bend the pivot pin in the process. It's better to just remove the safety and install the whole thing top-down.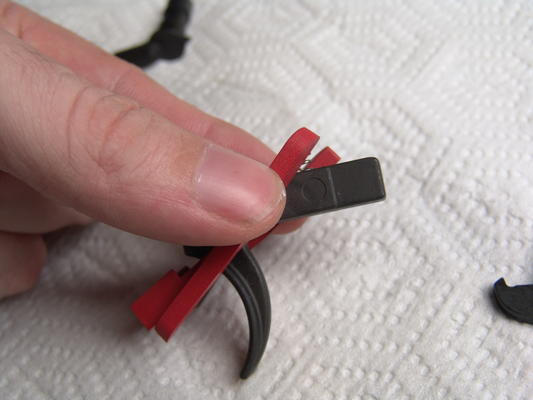 Here's how you want the receiver rug to be mounted to your trigger before you insert it. Note that the rear ears of the rug are angled upwards. This is because you can easily tuck the receiver rug ears down into place from on top after you've placed the trigger, but you can't get access below the trigger in order to push the ears to the side if they happen to be beneath it. Be careful, because the ears can kink (rotate 90 degrees) and look correctly locked in place. Here's how you want the receiver rug to be mounted to your trigger before you insert it. Note that the rear ears of the rug are angled upwards. This is because you can easily tuck the receiver rug ears down into place from on top after you've placed the trigger, but you can't get access below the trigger in order to push the ears to the side if they happen to be beneath it. Be careful, because the ears can kink (rotate 90 degrees) and look correctly locked in place.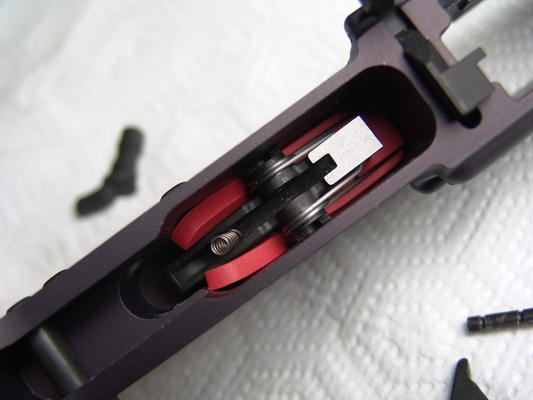 This is how the ears look when they're installed, but not yet tucked in. Note that they're flush against the side of the receiver, and perfectly straight. If they look like they've twisted and you can't tuck them down flat, you need to lift the trigger back out and repeat the procedure. This is how the ears look when they're installed, but not yet tucked in. Note that they're flush against the side of the receiver, and perfectly straight. If they look like they've twisted and you can't tuck them down flat, you need to lift the trigger back out and repeat the procedure. You can use a punch or small precision screwdriver to tuck down the ears of the receiver. As mentioned above, make sure that the ears haven't rotated 90 degrees. You can use a punch or small precision screwdriver to tuck down the ears of the receiver. As mentioned above, make sure that the ears haven't rotated 90 degrees.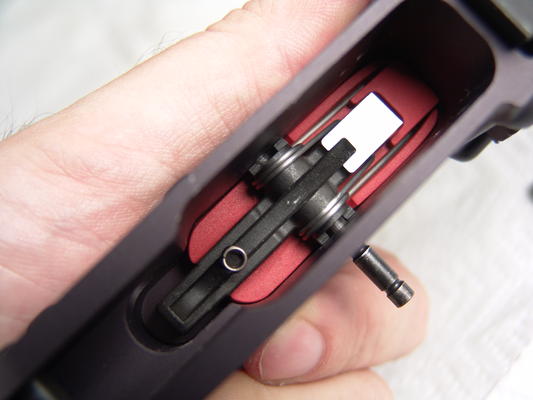 You can see how the receiver rug's rear ears are supposed to look when properly installed. Now it's time to reassemble the weapon - push in the pivot pin just far enough to lock the trigger in place, but not far enough in to prevent you from installing the disconnector. The reason I suggest doing this as a separate step is that the receiver rug will generally push up a little on the pins, so you'll have to use a bit more force than usual. You can see how the receiver rug's rear ears are supposed to look when properly installed. Now it's time to reassemble the weapon - push in the pivot pin just far enough to lock the trigger in place, but not far enough in to prevent you from installing the disconnector. The reason I suggest doing this as a separate step is that the receiver rug will generally push up a little on the pins, so you'll have to use a bit more force than usual.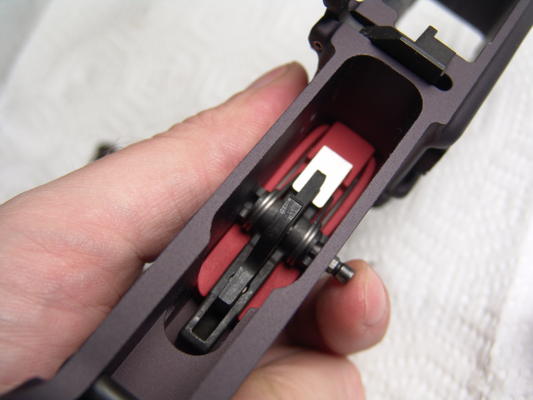 Once you've gotten the disconnector in place, push the pivot pin in the rest of the way. Once you've gotten the disconnector in place, push the pivot pin in the rest of the way.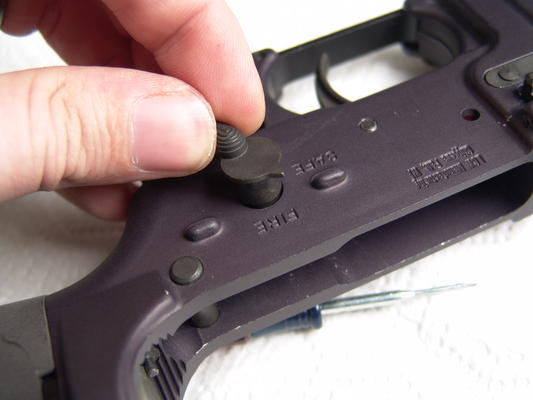 Install the safety selector. Push forward on the trigger so that the rear of the trigger won't prevent the installation of the safety selector. Next, take care of the safety detent, spring, and pistol grip. I personally didn't bother unscrewing the grip all the way, so it proved easy enough to screw it back in and thus lock the detent and spring back in place. Install the safety selector. Push forward on the trigger so that the rear of the trigger won't prevent the installation of the safety selector. Next, take care of the safety detent, spring, and pistol grip. I personally didn't bother unscrewing the grip all the way, so it proved easy enough to screw it back in and thus lock the detent and spring back in place. There aren't any more special tricks left to reassembling the FCG. From this point forward, installing the hammer and such is no different from building up a lower receiver. There aren't any more special tricks left to reassembling the FCG. From this point forward, installing the hammer and such is no different from building up a lower receiver.AlternativesAlmost all devices have alternatives. The one alternative I can think of which has a comparable reduction in propensity to jam, would be a Timney or other similarly designed drop-in trigger. Any trigger which still uses the basic AR-15 stock trigger design is susceptible to jamming. I will however say that if you're concerned about FCG lockups but don't want to spend ~$200 on a new trigger setup, the Receiver Rug is certainly the most cost-effective way to increase your reliability. -- SeanNewton - 16 Sep 2008 |


| I | Attachment | History | Action | Size | Date | Who | Comment |
|---|---|---|---|---|---|---|---|
| |
s_dsc04700.jpg | r1 | manage | 26.7 K | 17 Sep 2008 - 00:09 | UnknownUser | |
| |
s_dsc04700pc.jpg | r1 | manage | 20.2 K | 17 Sep 2008 - 00:35 | UnknownUser | |
| |
s_dsc04706.jpg | r1 | manage | 23.7 K | 17 Sep 2008 - 00:11 | UnknownUser | |
| |
s_dsc04706pc.jpg | r1 | manage | 16.9 K | 17 Sep 2008 - 00:35 | UnknownUser | |
| |
s_dsc04719.jpg | r1 | manage | 26.0 K | 17 Sep 2008 - 01:47 | UnknownUser | |
| |
s_dsc04725.jpg | r1 | manage | 22.3 K | 17 Sep 2008 - 01:47 | UnknownUser | |
| |
s_dsc04728.jpg | r1 | manage | 23.2 K | 17 Sep 2008 - 01:48 | UnknownUser | |
| |
s_dsc04729.jpg | r1 | manage | 22.6 K | 17 Sep 2008 - 01:48 | UnknownUser | |
| |
s_dsc04733.jpg | r1 | manage | 21.0 K | 17 Sep 2008 - 01:56 | UnknownUser | |
| |
s_dsc04737.jpg | r1 | manage | 24.4 K | 17 Sep 2008 - 01:56 | UnknownUser | |
| |
s_dsc04739.jpg | r1 | manage | 23.8 K | 17 Sep 2008 - 01:49 | UnknownUser | |
| |
s_dsc04742.jpg | r1 | manage | 23.0 K | 17 Sep 2008 - 01:49 | UnknownUser | |
| |
s_dsc04743.jpg | r1 | manage | 25.5 K | 17 Sep 2008 - 01:50 | UnknownUser | |
| |
s_dsc04745.jpg | r1 | manage | 25.8 K | 17 Sep 2008 - 01:57 | UnknownUser |
Topic revision: r4 - 01 Oct 2008 - SeanNewton


Ideas, requests, problems regarding TWiki? Send feedback