The "Range-Safe Mag-Lok", from Sporting Conversions
Although this is by no means a new product, the Sporting Conversions magazine lock was the first popular AR-15 magazine lock of its type for the California market. Until being eclipsed by the Prince50 maglock and various bullet button designs, the Sporting Conversion lock was a steady seller. Installation was simple, and it was difficult to argue that it was anything other than a fixed-magazine rifle. When purchased directly from Sporting Conversions, this kit cost $14.95 and remains one of the cheapest ways to render an AR-15 a fixed-magazine rifle. Unlike in a bullet button design, the magazine remains locked in place for as long the magazine lock is installed. The only common way to reload the rifle was to push the rear pivot pin and then "scissor" the firearm's action open.History (Apocryphal; must verify initial marketing date - perhaps interview SC?)
The Sporting Conversions lock was apparently first marketed around (1994?), when folks correctly concluded that fixed-magazine rifles would be exempt from the SB23 "evil features" issue. Although it saw some small amount of use at the time, it never caught on in California after the California Assault Weapon Ban took effect in 2000. From the time when Harrott vs Kings County overturned the "series" designation in 2001, until late 2005 when Allison Merrilees at the California Department of Justice Firearms Division acknowledged in writing that "off-list" lowers were legal, the mag locks were sitting unused and not particularly selling. Once the off-list movement started and folks were looking for a means to secure the magazines, the Sporting Conversions kits started selling like hotcakes. Until the Prince50 magazine lock came out, the Sporting Conversions kits' only competitors were home-made locks consisting of either Home Depot hardware or drilled-out set screws installed in various locations. The more intrusive methods actually drilled through the AR-15 receiver and the magazine, installing rivets or set-screws to make absolutely sure the magazines weren't coming out. When the Prince50 kit came out, the ease of restoration to a normal magazine release drew a lot of the Sporting Conversion kit's market away, and ultimately the introduction of the Bullet Button designs killed it. Sporting Conversion kits are no longer offered by most California dealers.Why the Mag-Lok was Safest at First
Early in the off-list movement, the DOJ kept attempting to push out underground regulations by changing the definition of a fixed magazine to require that a fixed magazine involve welding or epoxying magazines in place. The issue with going that route would have been that it would have defined all SKS rifles in California as assault weapons. Under the assault weapon ban, "SKS with detachable magazine" is a prohibited assault weapon. By changing the definition of a fixed magazine to a new one which the SKS did not meet, the DOJ would have created overnight felons out of thousands of gun owners across California. During all of the "standards of permanence" issue, a lot of folks were using the Prince50 maglock with a small allen set screw, as a magazine lock. These users, at the time, were the wild folks living on the edge. Because, in the most popular configuration, the magazine latch would function normally as soon as the allen screw were backed out, it would be difficult to disprove a malicious officer's allegation that, after he'd unscrewed the mag release's set screw, "it was like that when I found it". Thankfully, there were no documented cases of this. There was, however, a case of a police armorer whacking on a Prince50 mag lock with a mallet until the set screw broke because he thought the mag release was simply stuck. This technically constituted the manufacture of an assault weapon, but the matter was readily and resolved and the man ultimately regained possession of his rifle.Known Disputes
SemiAutoSam, a former Calguns user, claims to have developed his similar but flush-fit design prior to the Sporting Conversions design. However, his design never gained widespread popularity. It was arguably cosmetically superior, but was never produced in large quantity or low enough expense to achieve a significant market share.Installation
In order to build up a new lower with the Sporting Conversion mag-lock installed, you would follow all of the normal steps in building the AR-15 lower but omit the magazine latch installation step. That procedure will be replaced with the procedure below.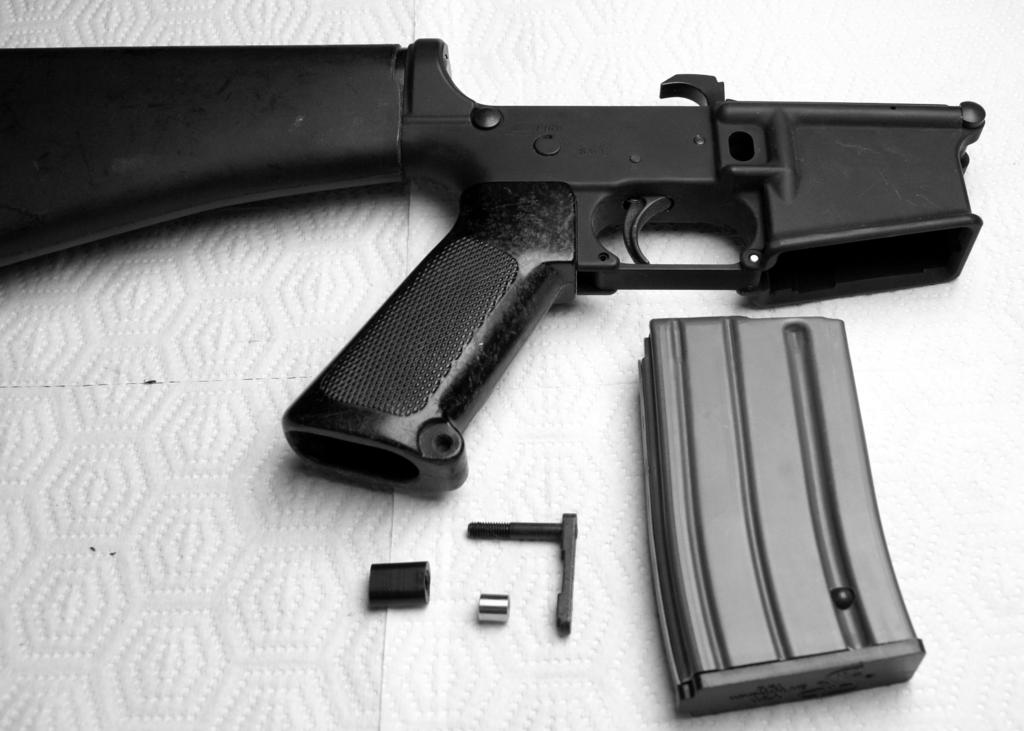 This is a picture of a Stag Arms lower receiver with Vietnam-era furniture, completed with the exception of the magazine lock. Bear in mind that under early interpretations of SB23 assault weapon law, this would have been considered an assault weapon on its own. In actuality, because the upper is incomplete, at this point it is neither semi-automatic nor centerfire. In my specific case, even if constructive possession were to apply at a state level, it would be moot as I possess not only a rimfire upper, but a bolt-action 50 DTC upper which I could lawfully install on it even without a magazine lock. You will notice the magazine release to the left of the magazine, and left of the release are a small nut and a plastic (Delrin, I think) spacer. Take note of the fact that the original magazine release button and spring are NOT USED when installing a Sporting Conversion maglock. I advise that you place both together in a zip-loc baggie and put them with the rest of your spare AR-15 parts.
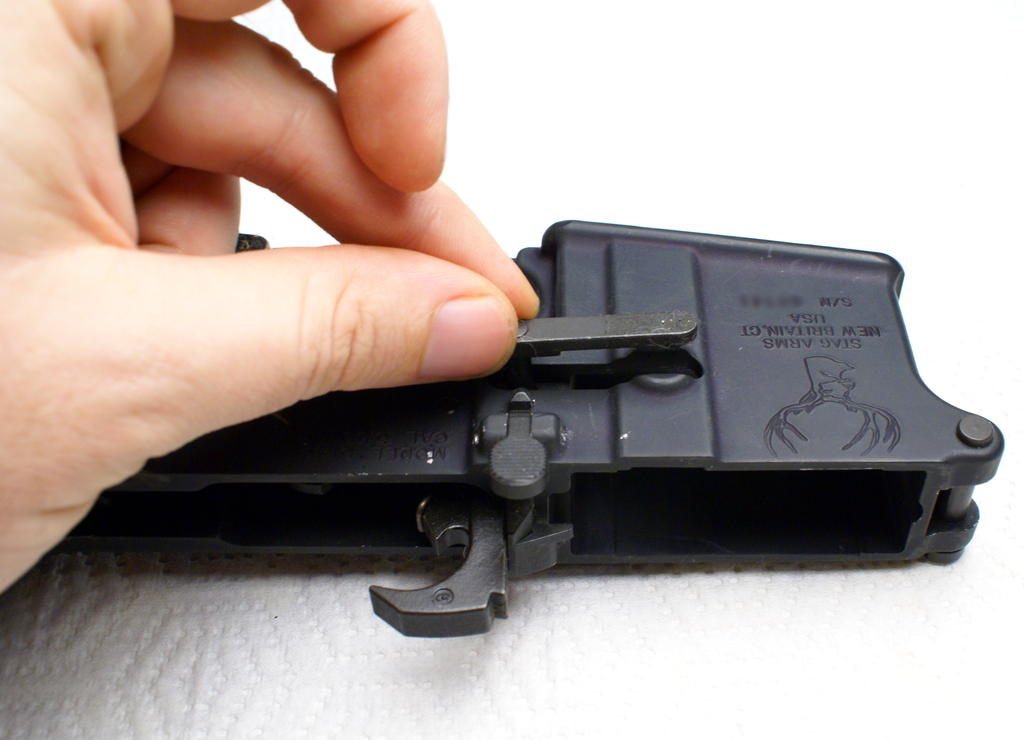
 This picture is taken without the magazine latch, strictly so that you can see where the magazine latch is supposed to line up. The hole in the magazine is locked into by the latch. If you have a spare person on hand, or are talented with your knees, you may make your life a little easier by holding the magazine in this position before you drop in the magazine latch.
 Inserting the magazine latch. I put the magazine latch in place first, because the bolt hold open assembly is already installed on the lower. Without the latch to hold the mag in place, the bolt hold open spring and the magazine's follower spring will work together to push the magazine out of the magwell without having inserted the magazine latch first. Personally, with the magazine latch just loosely in place, I then push the magazine up in the magwell until the latch drops into the hole in the magazine's side, locking it loosely in place. You may need to exert a slight bit of pressure to get it to go in, but because there are no springs acting against the latch and it's designed to let mags go up and not down, it should hold fine.
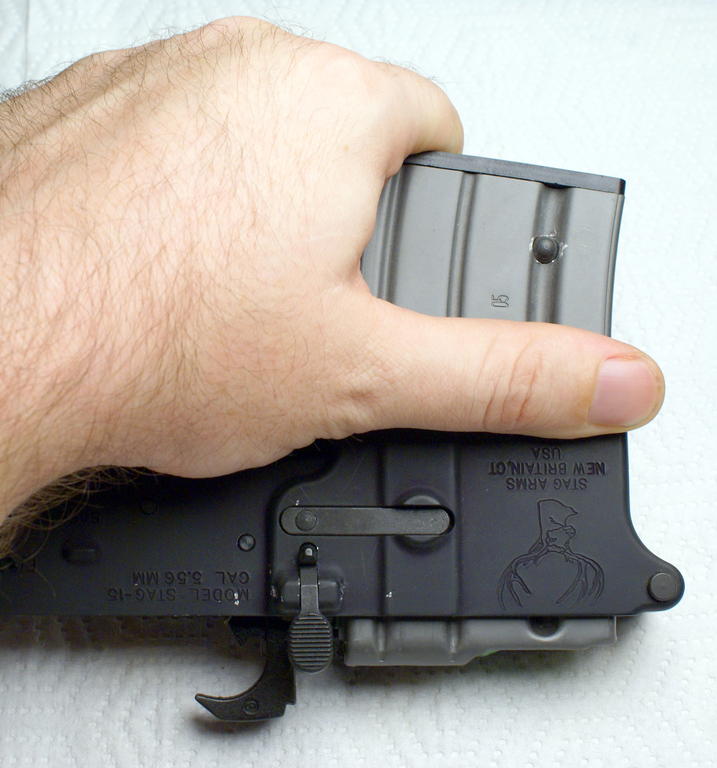 Either way you went about getting the magazine into the magwell, you should see it like this. I then take my hand and hold the mag in place, and cover the mag latch with my palm so that it can't come out before flipping the receiver over to do the next step. When you've got it more or less flat against the surface, you don't need to keep holding onto the mag latch; it'll stay in place because it's more or less flush with the left side of the receiver.
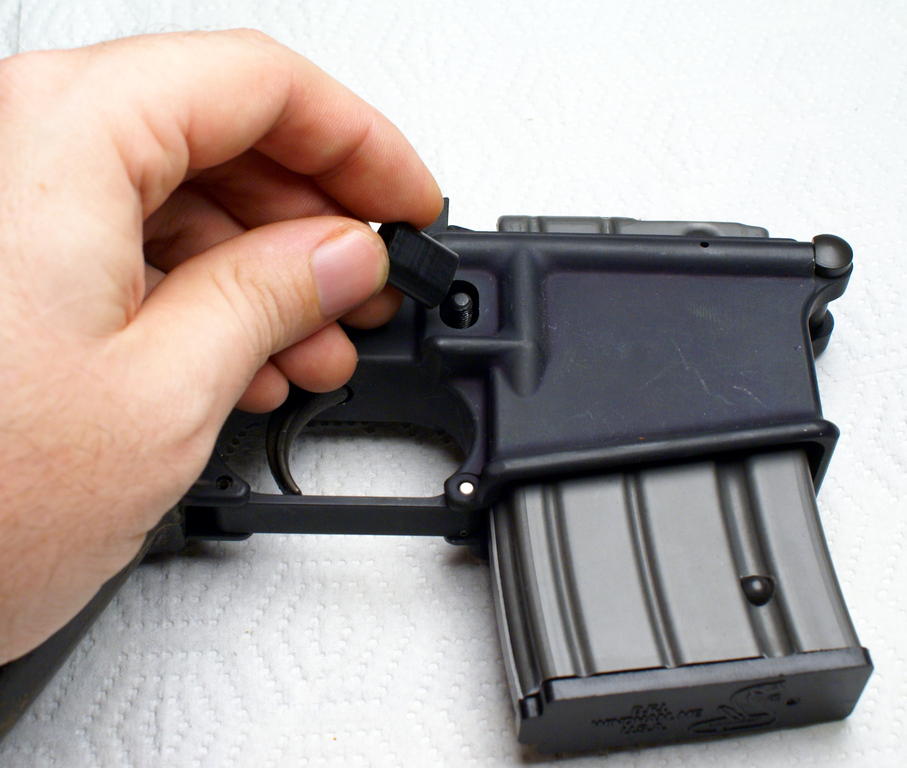 Inserting the polymer spacer. Notice that it's identical on both sides; there is no right or wrong direction to insert it. The center hole is for the magazine latch screw.
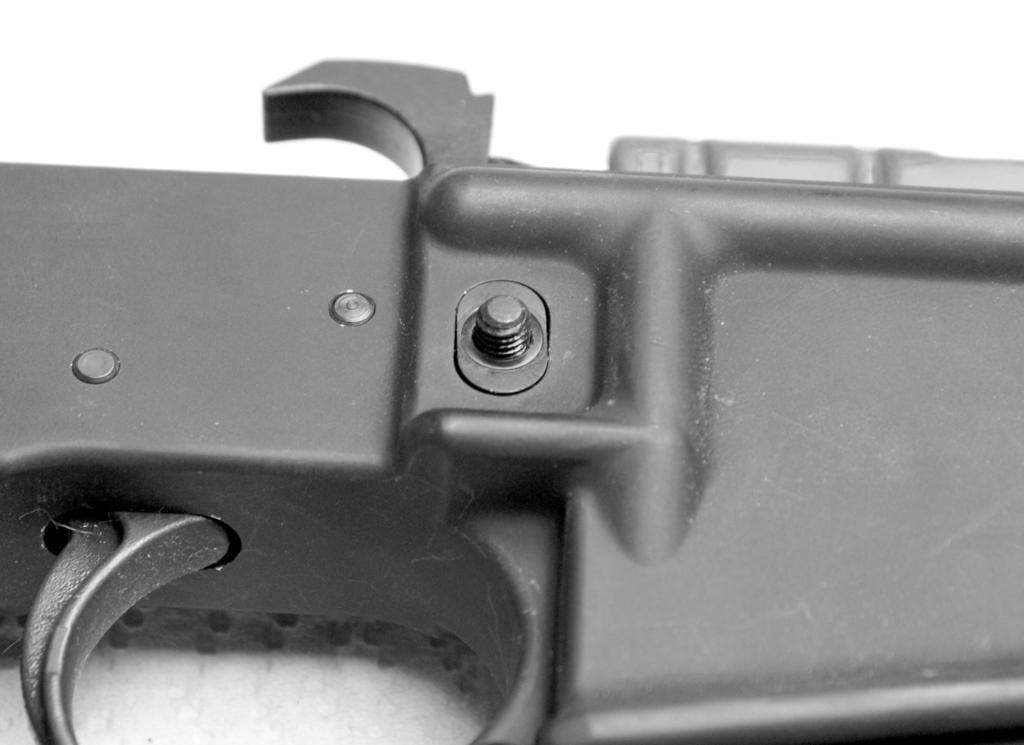 It should end up more or less flush with the right side of the receiver. You will notice that I have used this maglock before - a proper installation involves tightening it to the point where you cannot remove it with your fingers. If you're particularly cautious, you may use locktite to further ensure its immobility. This is very important - in order for it to be a magazine lock, it must require a tool to remove the magazine from the weapon. If it's "finger-tight" and you can loosen the maglock with your fingers, then it is legally the same as having the normal magazine release on the rifle to begin with.
 Putting the nut onto the threaded end of the mag latch. Naturally, there's nothing wrong with finger-tightening it initially - it simply cannot be left finger-tight when you have completed the rifle. You will notice that the nut itself is extemely well polished on the sides - it is intended to reduce the amount of traction that fingers attempting to unscrew it would have.
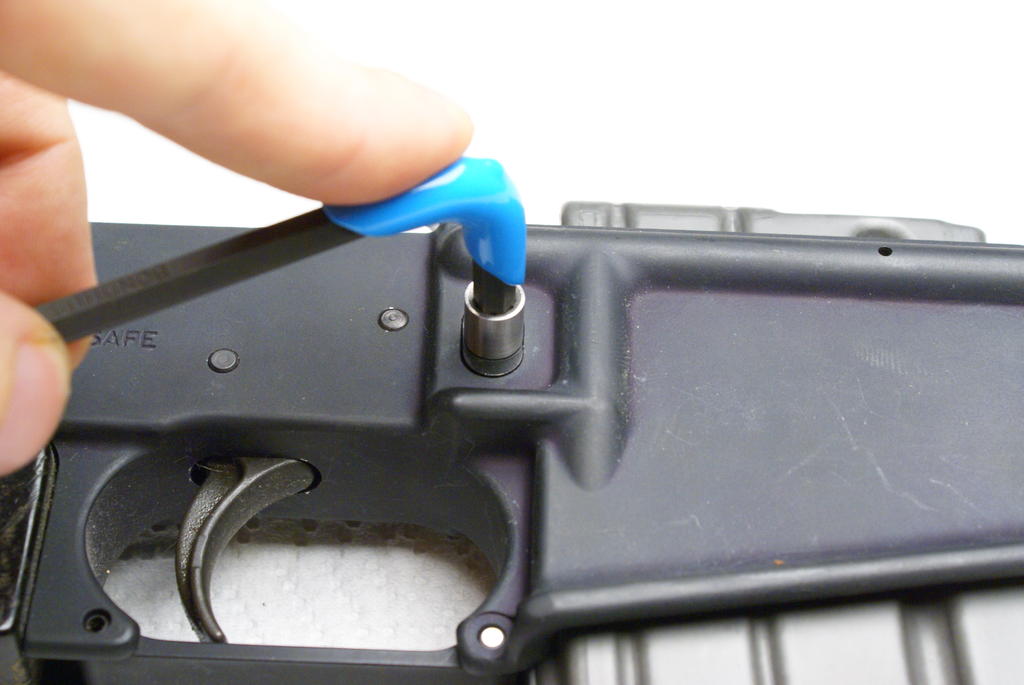 Finishing the job by tightening down the lock with an allen wrench. Early Calguns off-list t-shirt designs included a graphic of an allen wrench in a circle, with a slash through it, and the words "No, I don't have an allen wrench". In case you were wondering where to get this particular blue-hooded allen wrench, it's from the Dillon Precision allen wrench set. Yes, I enjoy the taste of the blue Kool-Aid.
-- SeanNewton - 18 Nov 2008
Finishing the job by tightening down the lock with an allen wrench. Early Calguns off-list t-shirt designs included a graphic of an allen wrench in a circle, with a slash through it, and the words "No, I don't have an allen wrench". In case you were wondering where to get this particular blue-hooded allen wrench, it's from the Dillon Precision allen wrench set. Yes, I enjoy the taste of the blue Kool-Aid.
-- SeanNewton - 18 Nov 2008This topic: Gunwiki > WebHome > ArticleIndexByGun > RefArFamily > RefMagLockSportingConversion
Topic revision: r2 - 02 Aug 2009 - SeanNewton
Ideas, requests, problems regarding TWiki? Send feedback