Analysis of the Rock River Arms 9mm System
A good friend recently gave me an opportunity to borrow his 9mm AR upper so that I could figure out exactly how it worked. I've wanted to do this for some time, and I was pleased with the opportunity to take plenty of detailed pictures of the differences between the two uppers. There are two other major types of AR-15 9mm setups (Colt and Olympic), and eventually I hope to also obtain samples of these types of uppers for side-by-side comparison.Bolt Carrier Differences
I'm fairly certain that the only parts shared in common between a standard 223 bolt carrier and a RRA 9mm carrier are the screws and the small pins which hold the firing pins in place. All of the other parts are remarkably different.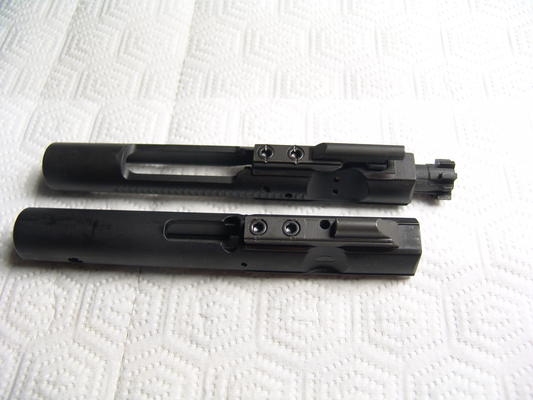 From a top side view, the absence of a gas impingement system is a very obvious difference. The 223 (above) has a 'cup' up top for the gas to push against, while the 9mm only has the vestigal bump in order to help prevent the carrier from tilting.
 Side by side, a substantial difference with the 9mm carrier (left) is that the bolt and bolt carrier are one piece. On the 223 (right), the rotating bolt is a very large difference.
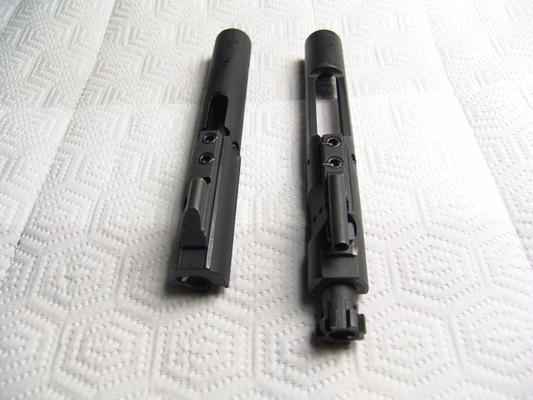 Top view. Notice how the Rock River carrier has a shorter slot? Just more examples of having more material in order to have a heavier bolt carrier.
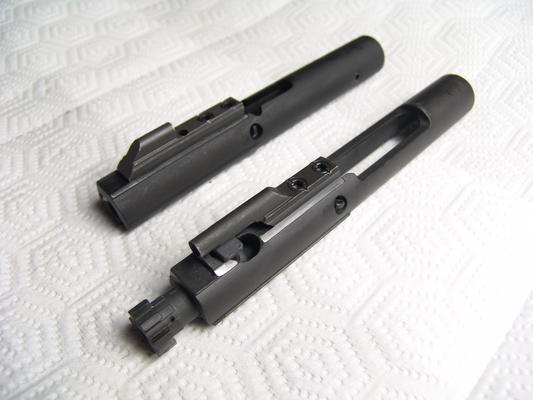 A diagonal view. You'll notice the slot on the 223 bolt carrier (on the right) to allow the bolt to retract and rotate as it slams into the forward position. As noted earlier, the 9mm has no counterpart of this, and is a straight blowback action with no rotating/locking bolt. However, you will notice that the pins which keep the firing pin in place are identical between the Rock River and Stag bolt carriers.
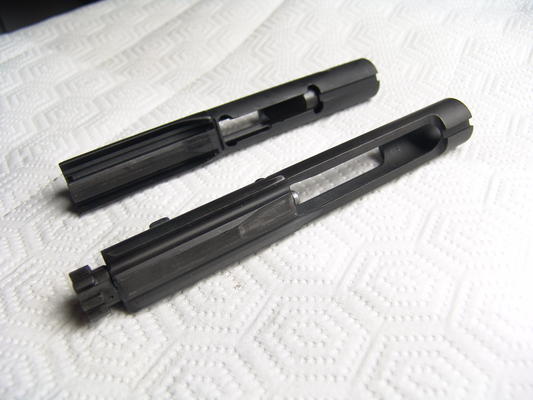 The under view of both bolts shows (if you look quite closely - there's a closeup later, though) that the 9mm bolt has a deep groove on the left side of the bolt, for the extraction hook on the magazine well adapter.
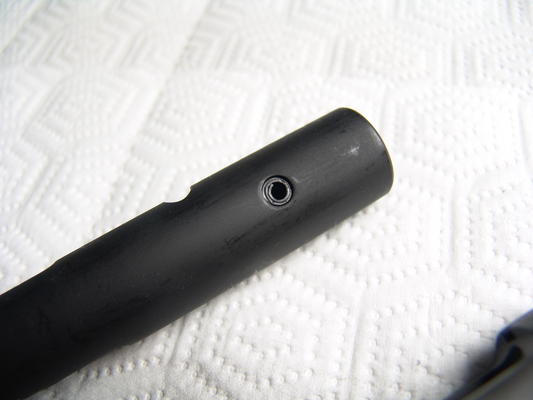 Notice the roll pin in the back. This pin penetrates through both sides of the bolt carrier, and holds the rear carrier weight in place.
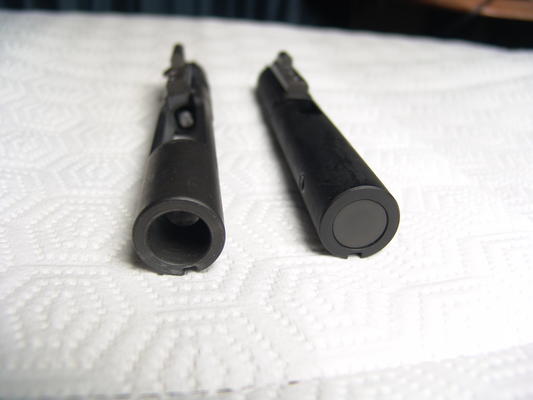 Notice the difference between the rears of the two bolt carriers. There's a substantial weight difference, caused by the insertion of what appears to be a steel weight into the back of the 9mm bolt carrier.
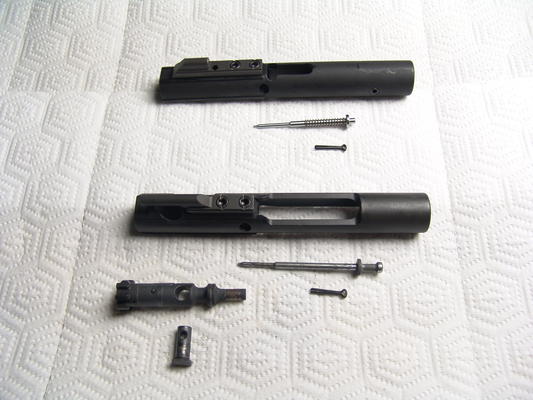 This is both bolt carriers stripped. You'll notice that the firing pins are visibly different between the two. As has been noted, the rotating bolt on the 223 adds quite a number of additional moving parts to the 223 bolt carrier.
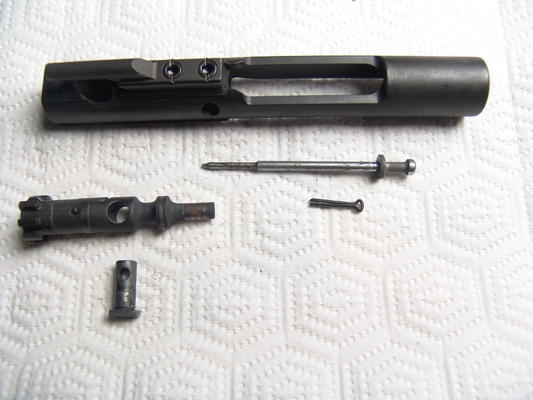 Closeup on the disassembled 223 bolt carrier. Notice how the firing pin is fairly long? Unlike the 9mm firing pin, it isn't spring-loaded. It also happens to be longer than the 9mm firing pin.
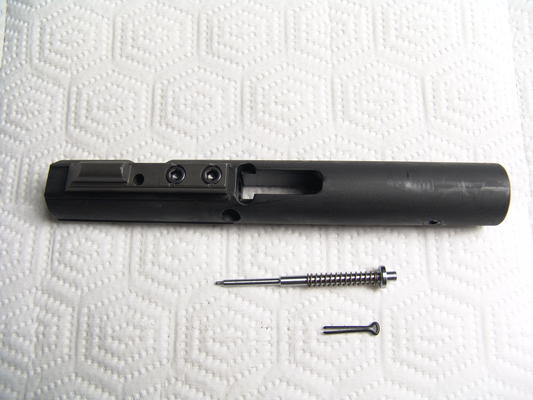 Closeup on the disassembled 9mm bolt carrier and firing pin. As mentioned above, the 9mm firing pin is spring-loaded. This is necessary because in the 223 design, the bolt slows its travel near the end of its recoil cycle, and the firing pin isn't subjected to as great of an impulse as it locks into battery. In the 9mm system, the bolt carrier slams into battery and stops abruptly. Without a spring to counteract that impulse, it would be possible for light primers to result in slamfires or out-of-battery explosions.
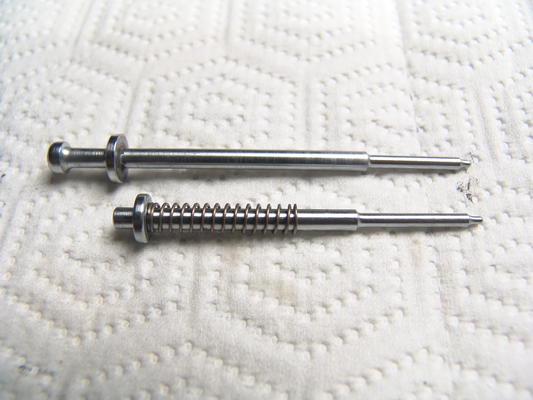 Side-by-side view of the 223 and 9mm firing pins. You'll notice that the 9mm pin is actually shorter than the 223 pin. The shaft is almost the same length, but most of the reduced length comes from shortening the rear striking surface.
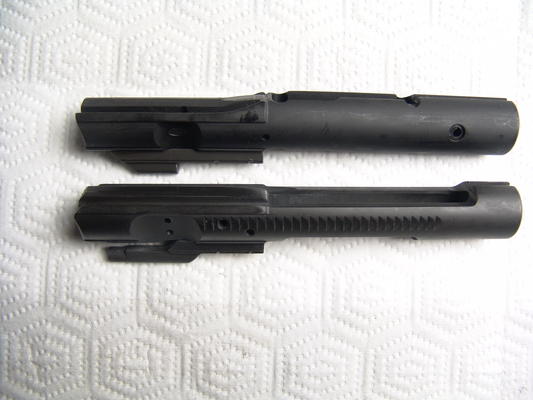 Right-side view of both bolt carriers. Notice the notches on the 223 carrier? Those are for the forward assist to gain traction when pushing the carrier into battery. The 9mm bolt carrier doesn't have them.
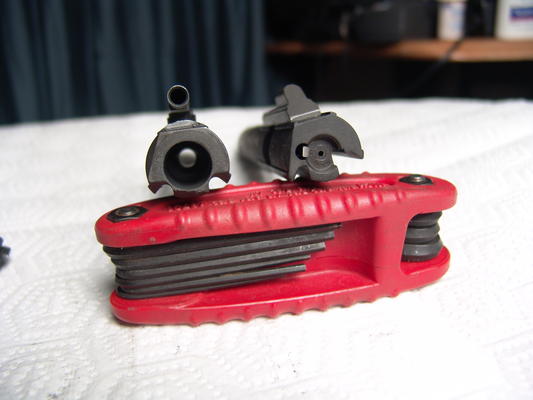 Front view of both bolt carriers. The bolt has been removed from the 223 carrier, so that it's possible to pay more attention to the carrier itself. Notice that the extractor slot is machined into the side of the 9mm bolt/bolt carrier because it's one piece. The 223 bolt (not pictured here) has its extractor on the bolt face.
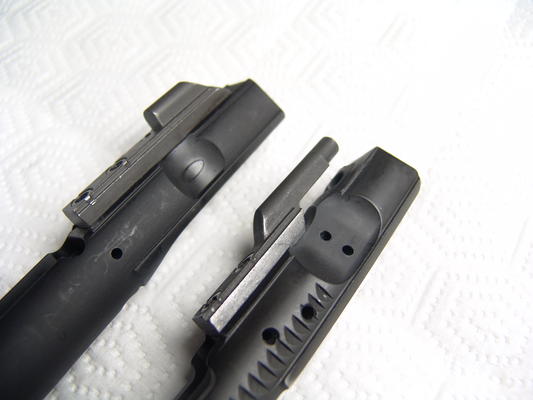 Close-up detail shot of the forward right side on both bolt carriers. The grooves for the forward assist are quite apparent for the 223, but not so much on the 9mm. Notice that the side cutaway is actually smaller on the 9mm than on the 223. However, whereas the 223 has a couple of small holes drilled in the side, the 9mm only has an oval insert of some sort. I have a hunch that the two holes on the 223 are to allow gas to vent after the bolt has gotten past a certain point. Also, farther down there are another two holes drilled in the side of the 223 bolt carrier, whereas the 9mm only has one (which is identified as being for the fiting pin retention pin.
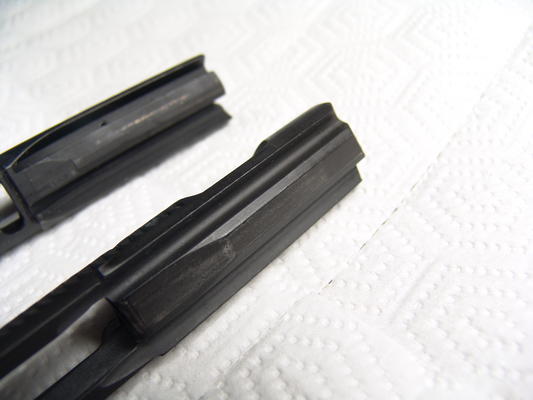 Close-up of the underside of the two bolt carriers. I'll have to come back to this one later, when I've had the time to identify exactly which pin is which in this picture.
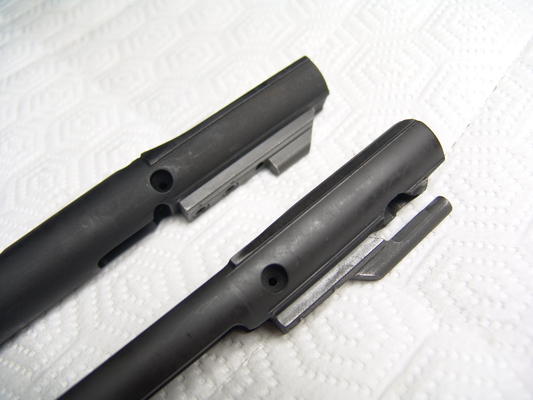 Close-up on the left side of both bolt carriers. This side looks more uniform between the two; the holes are for the firing pin retention pins.
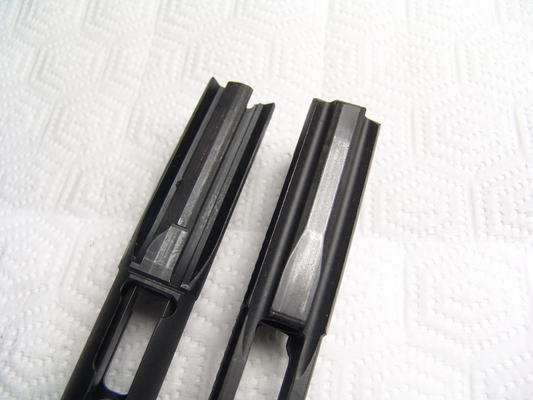 The underside of both bolt carriers. Notice that the 223 (right) has a smoother, longer slope leading up to the bolt area. The 9mm is more angular, and has a deep groove towards the right side in the picture. The groove is on the left side of the bolt when it's in a normal orientation, for reference. At any rate, that groove is what the magazine adapter's extraction hook slides along. More on that later, of course.
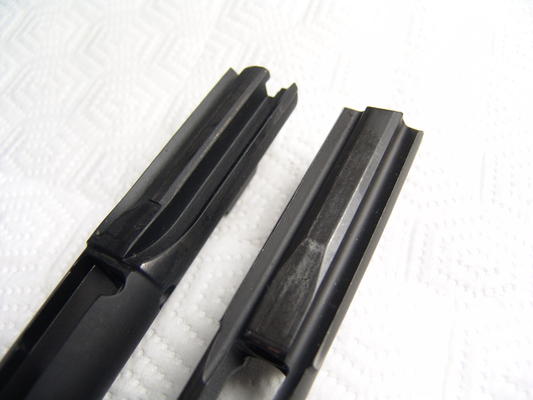 A far better view of the groove on the 9mm bolt carrier. Notice also the contoured curve to the left side of the 9mm carrier (right side of the pic) and the divot immediately behind it.
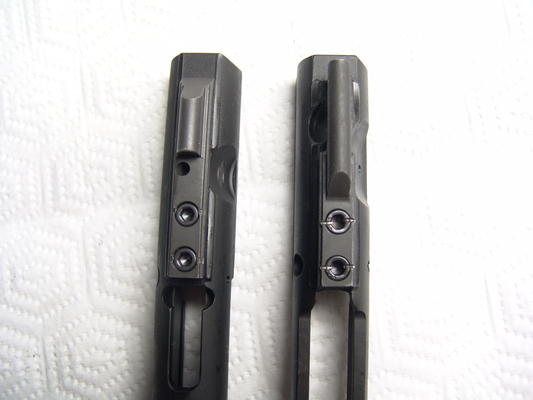 A top-down detail shot of the front part of both bolt carriers. Notice the hole drilled immediately after the 'hump' towards the front of the 9mm carrier? I don't know what that does. Also, notice the 9mm's scooped out area right behind the front of the bolt carrier, and the narrower channel compared to the 223 carrier to the right.
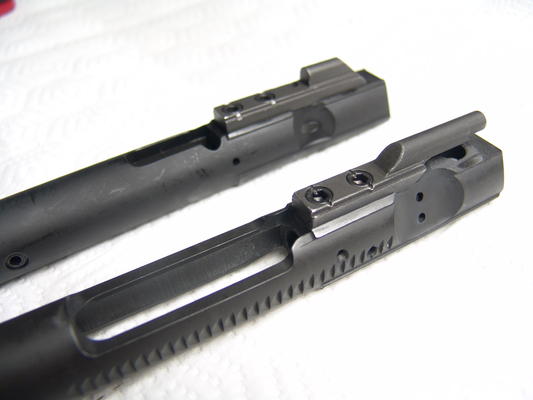 A detail shot emphasizing how much open area there is in a 223 bolt carrier compared to the 9mm.
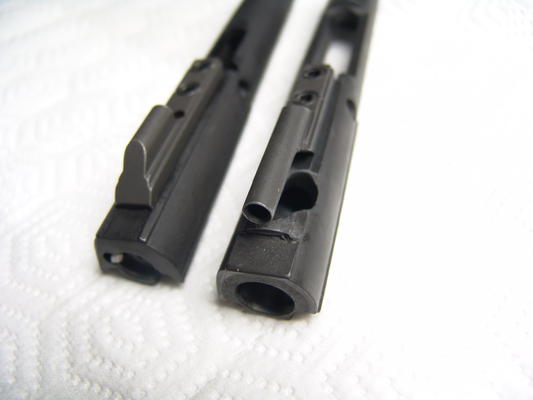 Notice how the 223 bolt carrier has a ridge just before the gas tube riser, while the 9mm doesn't? I'm not sure what that ridge does, although I have a hunch it may be some kind of failsafe headspacing measure.
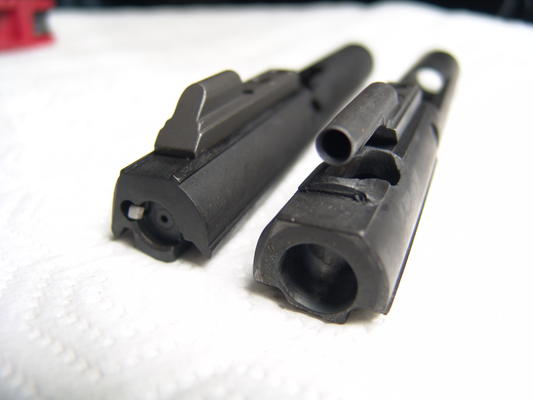 Slightly different angle for the same items mentioned above. This one really brings out that ridge I'm unsure of.
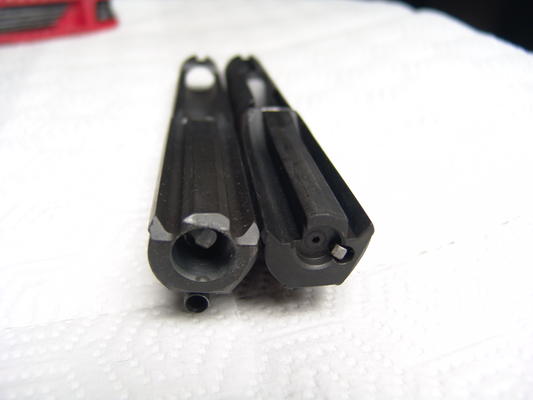 The 9mm bolt carrier (right) has a nice clear view of the claw which locks onto the rim of the 9mm round. To the left in the picture, you'll find the deep ridge I've mentioned a few times.
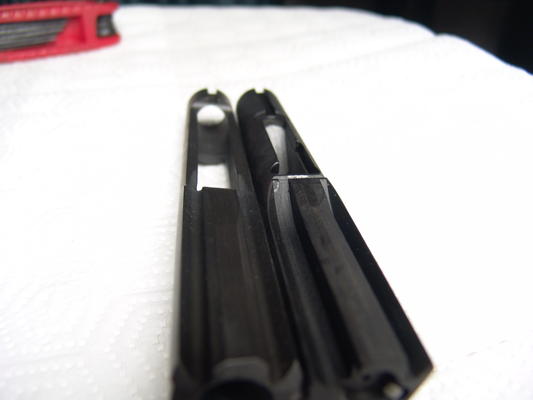 Notice, the 9mm bolt carrier has a contoured ramp at the rear of the grooved area, while the 223 just ends. I suspect that the contouring may be to help stop recoil, in case the blowback action actually imparts a sharper recoil impulse to the mechanism than the gas impingement action. I strongly suspect this is the case, given that 9mm is typically loaded with faster-burning powders.
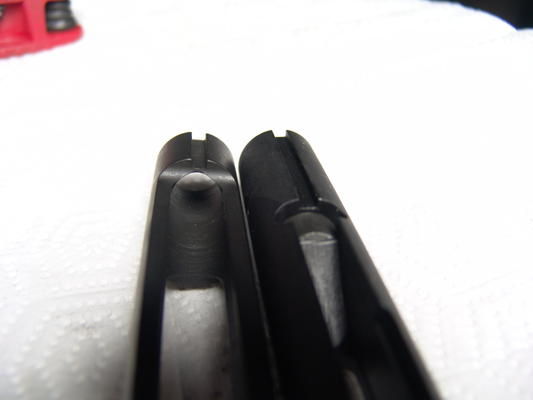 Notice how the weight at the end of the bolt carrier has an integral ramp as well.
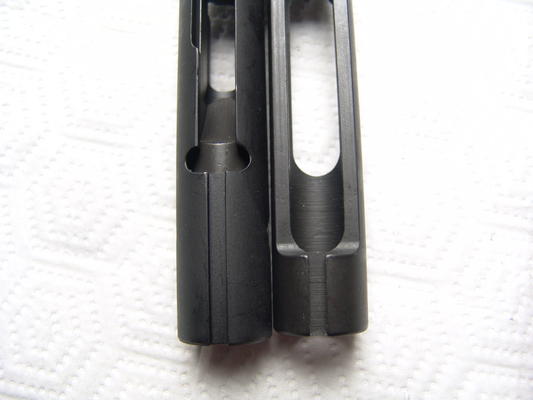 The 9mm carrier is on the left, and the 223 carrier is on the right. Notice how the hammer slot is the same diameter, but there's a lot of material milled out of the 223 that's left in the 9mm? However, the hammer slot widens considerably farther down in the 9mm, compared with the slot on the 223.
 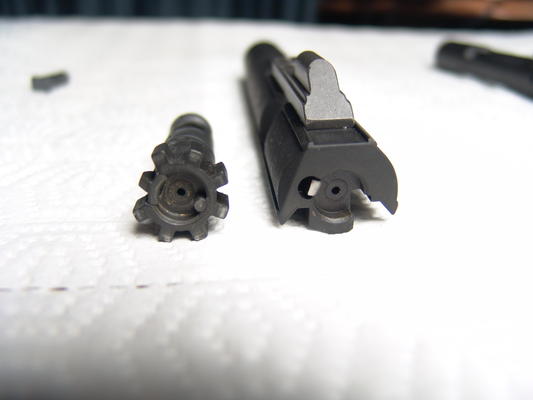 A comparison of the 223 and 9mm bolt faces. Notice the teeth on the 223 bolt, which lock into the corresponding bits on the barrel. Notice also that the 9mm bolt face looks a little bit deeper than its 223 counterpart.
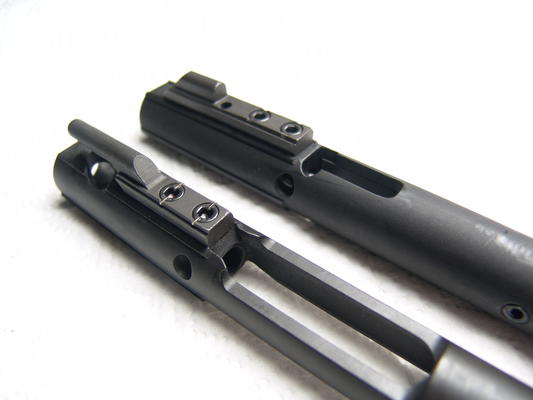 Notice the scooped-out part of the 223 bolt carrier (in the foreground)? The 9mm bolt carrier's got far more material than the 223 here.
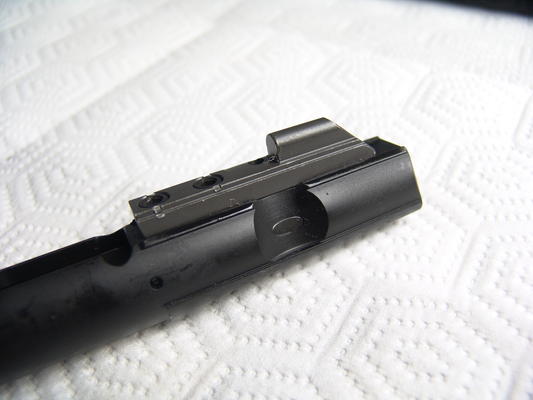 A close-up showing only the right side of the 9mm bolt carrier.
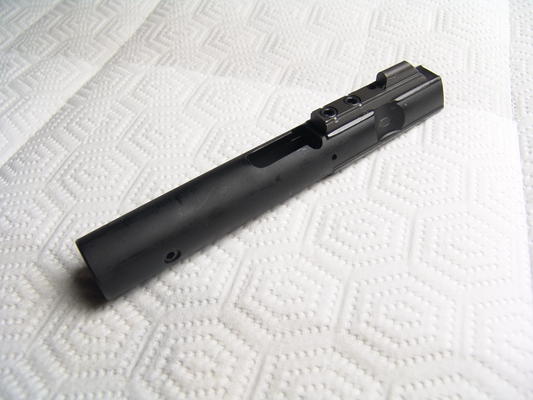 A more distant shot showing only the right side of the 9mm bolt carrier.
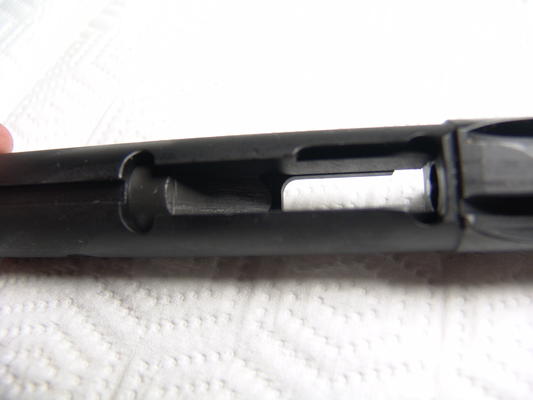 A shot of the underside of the 9mm bolt carrier, revealing the open part behind the firing pin.
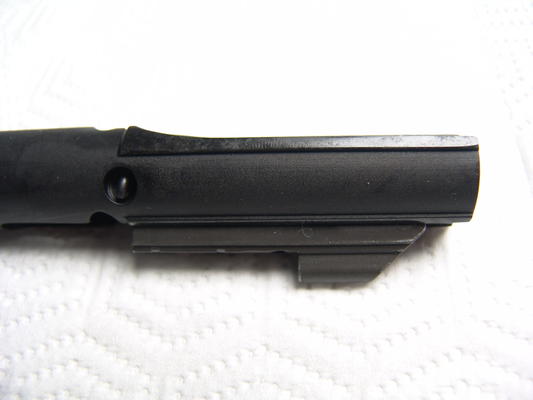 Closeup on the front left side of the 9mm bolt carrier.
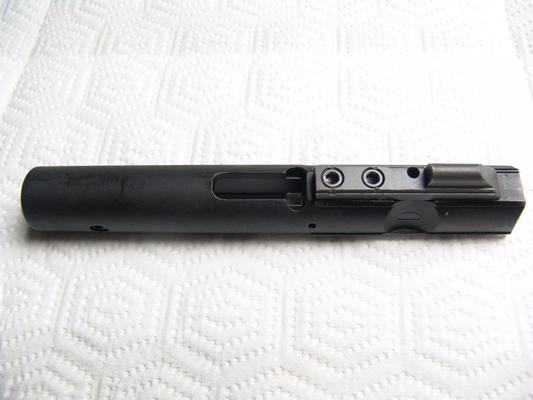 Full-length shot of the top of the 9mm bolt carrier.
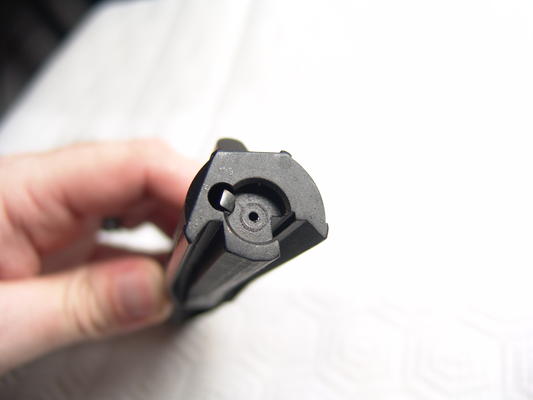 Close-up on the front of the 9mm bolt face. Notice how visibly larger the groove is on the left side. Take particular note that it actually intrudes upon the left side of the bolt face. This does mean that when the round is being fired, the very base of the case is unsupported on the lower left side. This could pose a problem for brass longevity. The actual reason for the groove, is that the magazine block has a hook on it that goes along the groove. When the bolt carrier travels rearward, the hook hits the left rear part of the case and kicks it towards the ejection port during the rearward travel.
The Upper Receiver
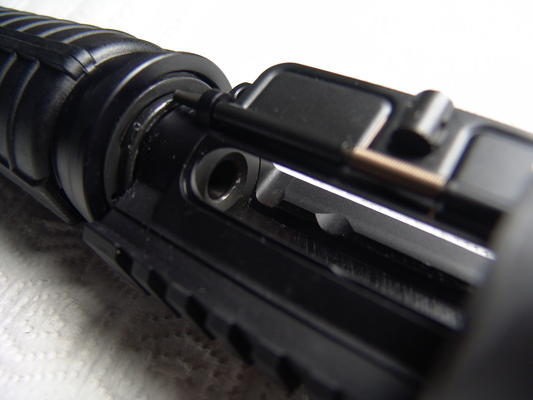 Notice how the 9mm barrel just starts immediately. Unlike the 223 barrel, it's just a smooth bolt face which the bolt carrier fits smoothly up against. Also, notice the two vertical notches on the upper's left rail. The first notch is immediately after the barrel, and then there's another notch a short distance back from it.
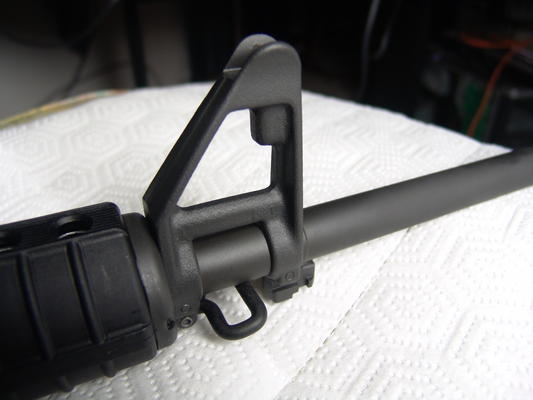 The front sight block of the 9mm upper. Because the 9mm doesn't have a gas system, there's no gas tube to pin into the front sight block. If you look at this part of a 223 upper, you'll notice a small hole where there's a roll pin keeping the gas tube in place.
The Magblock
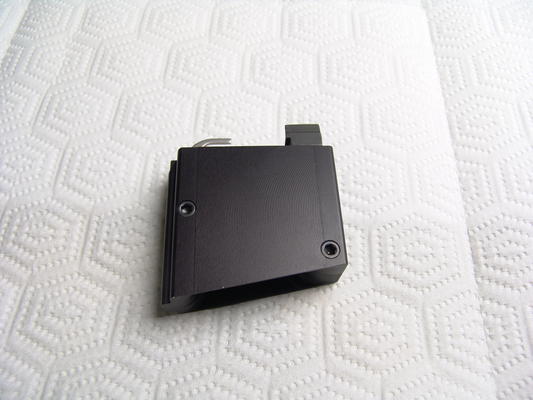 The Hahn Custom Uzi magblock fits into the magazine well, and has a small opening in the middle to allow an Uzi magazine to be inserted. It's held together by four hex screws, plus something else that I'm not sure about. I suspect there was another screw in the front of the assembly, but I wasn't about to risk damaging my friend's magblock to find out for sure.
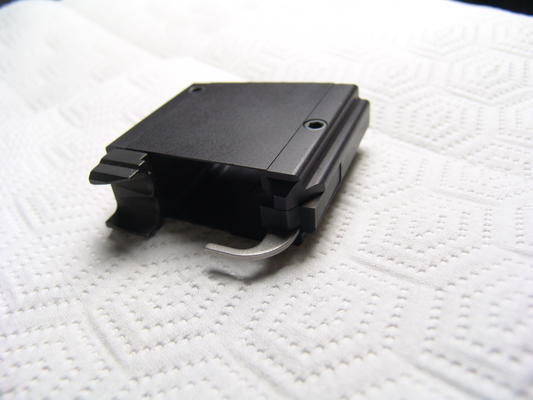 Top view. Notice the silvery hook to the left of the magblock? That's the one I mentioned earier, which serves as an ejector and fits into the groove on the left side of the bolt carrier.
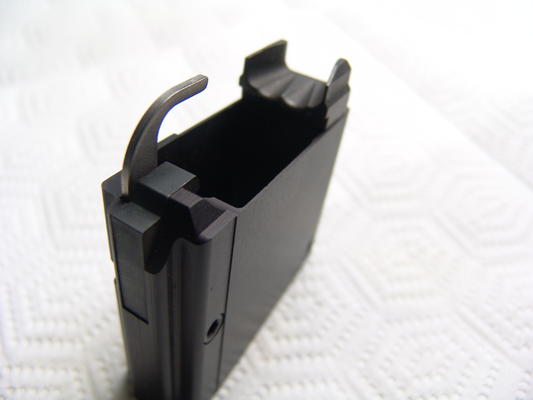 Rear view. You can clearly make out that the 9mm magblock provides feed ramps for the rounds being fed into the chamber. It is noteworthy that the bullet ramp system is one of the substantial differences between the RRA and Olympic 9mm systems. Also, note the existence of the hook-like device coming up from the rear of the magblock. When a magazine's follower rises to the top of the magazine, signifying that it is empty, the follower pushes the hook up. The top of the hook device sits high enough that, when the magazine follower reaches the top, the top of the hook pushes the bolt hold open on the lower up and locks the bolt open.
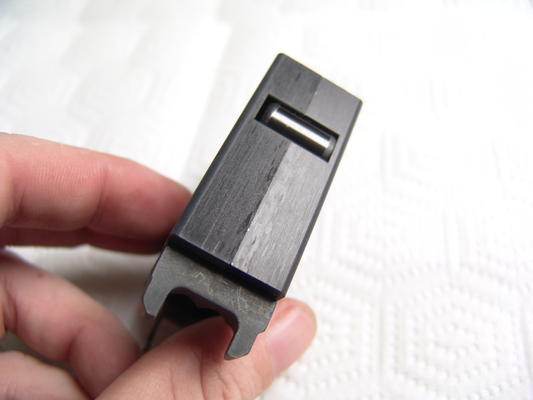 As you can see here, the magblock appears to start off as two pieces of CNC-machined metal, which is then secured together. The "roller" below is significant, as it exerts considerable tension on the front of the lower receiver to ensure a firm fit in the magwell. The chances of this coming out unintentionally post-installation are nearly non-existent.
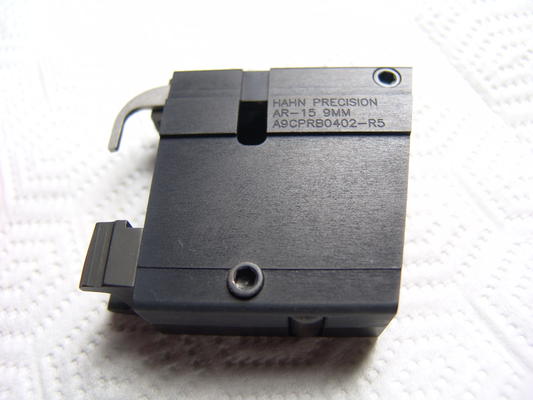 As you can see here, the AR-15 magazine release latch is used to secure the Uzi magazines in place. It's my understanding that you have to cut a notch in them in order for them to remain in the AR.
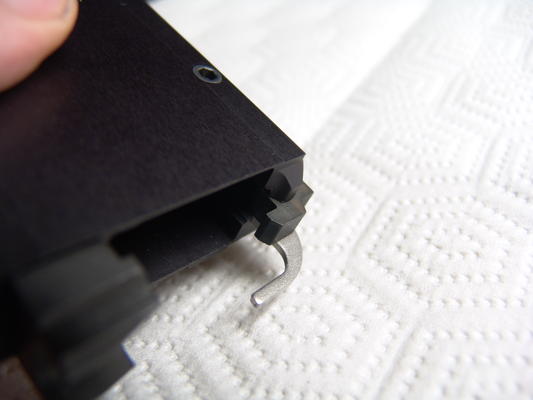 A detail shot which shows the front of the 'hook device' that actuates the bolt hold open.
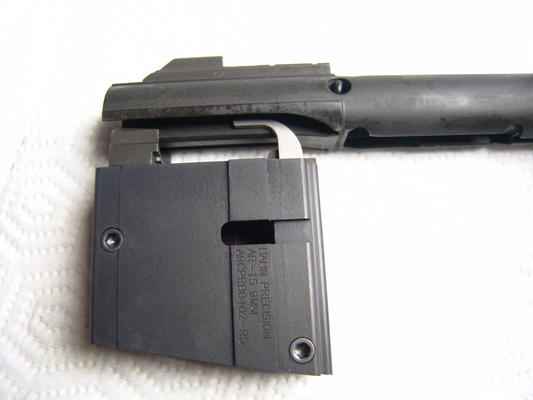 The magblock and bolt carrier as they would interact during operation. This is approximately the position they would be in when a round is ready to fire.
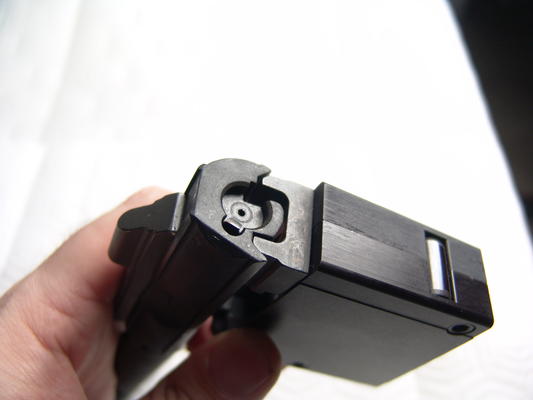 Front view of the same respective position. I'm not sure, but I do suspect that a firing position would actually have the bolt carrier a bit forward of this.
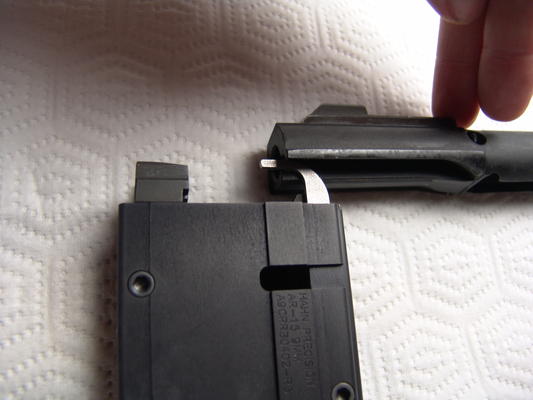 The bolt carrier in the recoil position, as it would appear after a shot has been fired. Notice that at this point, the magblock's ejector is protruding from the bolt face and will have sent the expended casing flying away to the right.
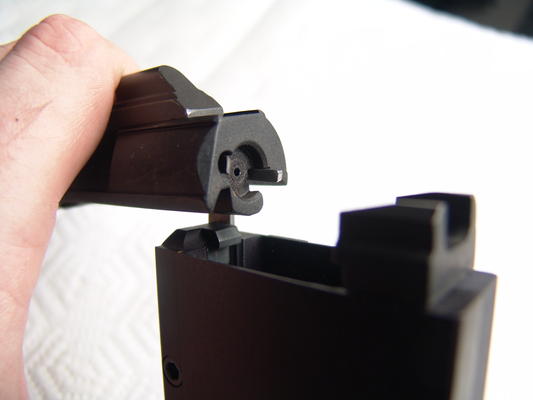 Front view of the same position.
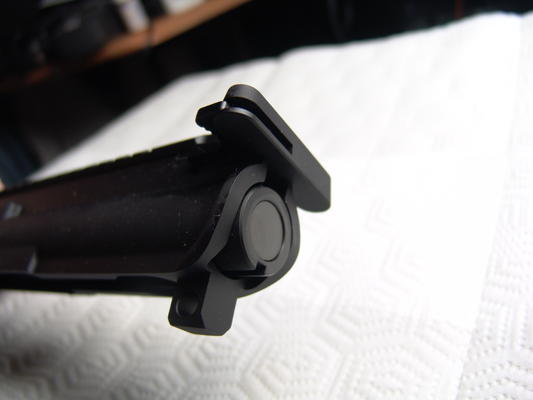 The rear of the bolt carrier, installed in the upper.
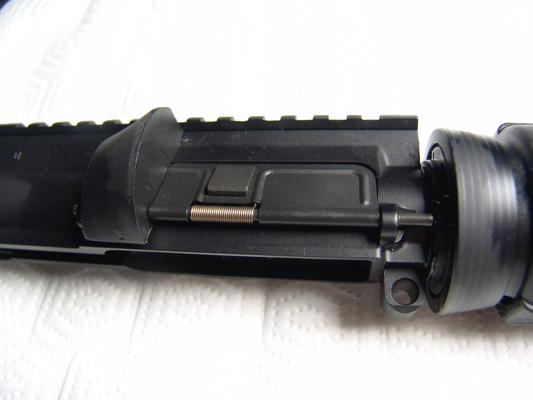 A closeup on the ejection port. Notice that it's very small compared to its 223 counterpart. Also take notice of the spring-loaded polymer device where a brass deflector would normally sit. Redhorse, of Calguns, states that this is designed to redirect gas, and not brass. The gas impingement system on a normal AR forces the gas through a few different places, reducing the energy which the departing gasses have by the time they escape. In a straight blowback system, the gas will vent more forcefully and this device is there to redirect it away from the shooter's face. This is a better explanation than anything I've come up with, so unless RRA has a different one, this is what I will assume this protrusion is for.
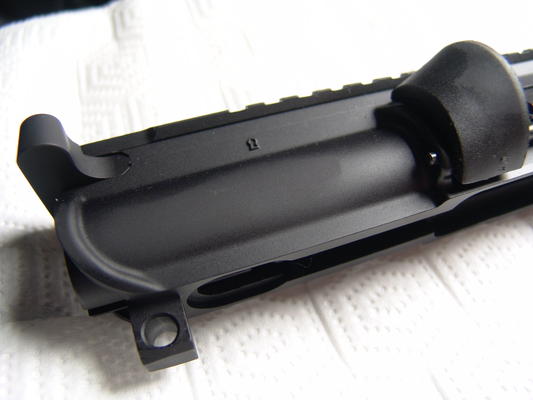 A "keyhole shaped" marking on the right side of the receiver.
 The ejection port open. As you can see, it's basically a standard 223 ejection port cover that's been cut down smaller.
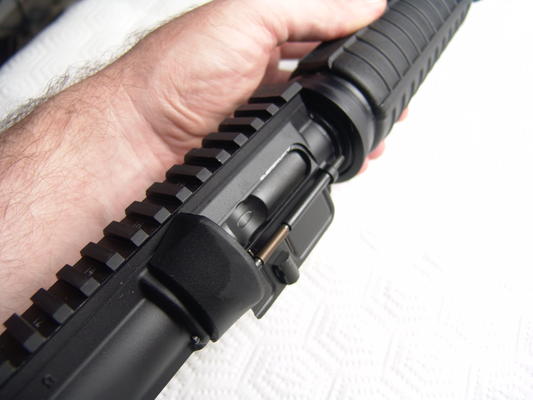 Another view of the ejection port area. Notice the roll pin sticking out from behind the gas deflector.
 A closeup on the Rock River logo engraved in the back of the receiver.
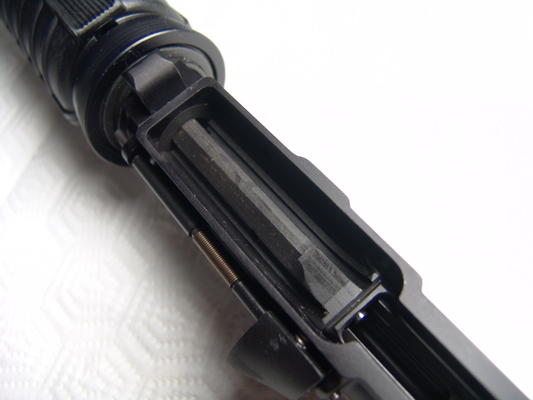 The underside of the upper, with bolt carrier installed. Notice the firing pin (silvery nub) protruding from the back of the bolt carrier's forward area.
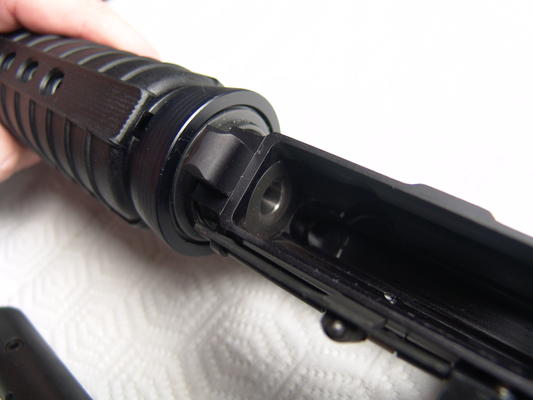 The underside of the upper, with the bolt carrier pulled out of the way. Notice the end of the barrel - unlike a 223 barrel, it's completely smooth - there are no M4 feed ramps, and there are no locking lugs sticking. All you see is the chamber.
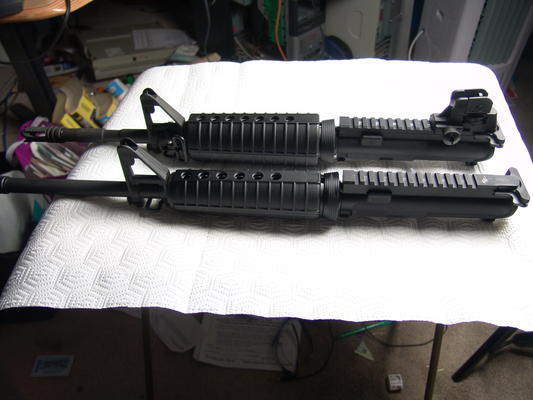 Side view of the 9mm upper (foreground) next to the 223 upper.
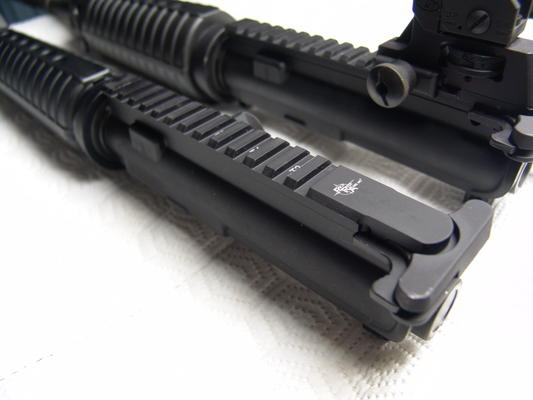 Left-side rear view of both uppers, same orientation. Notice that from this side, there is no way to visually identify the 9mm unless (as in this shot) you have a high enough angle to notice the oversized gas deflector.
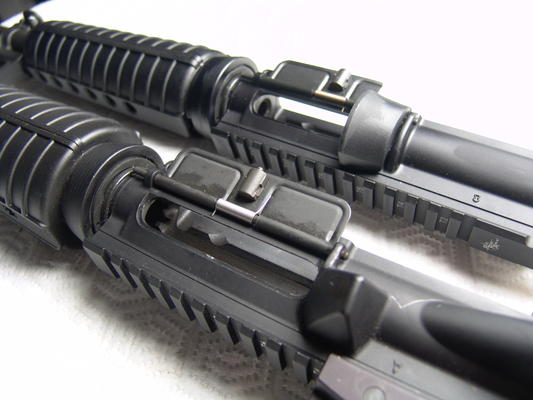 A view of both uppers on their side, presenting their right sides. You'll notice that the 9mm (above) is readily identified by its smaller ejection port and oversized polymer gas deflector. Notice that in the spot where the 223 upper has a brass deflector, the 9mm is bare. Unlike its 223 counterpart, the 9mm gas deflector is actually a separate part.
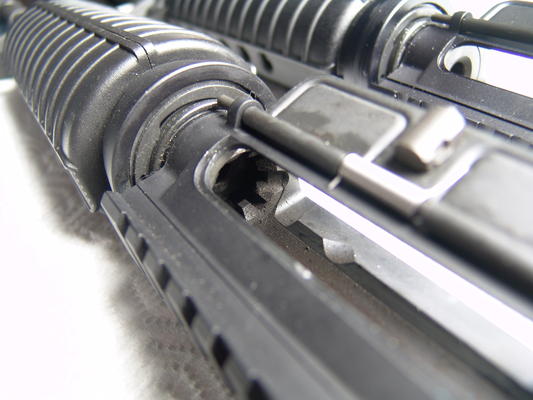 Closeup on the rear of the 223 barrel, including the locking lugs. Notice the recesses on the interior of the receiver - these recesses are for the the cam pin, which rotates with the bolt in the upper. Note that the 9mm upper does not technically require this, as it has no protruding cam pin.
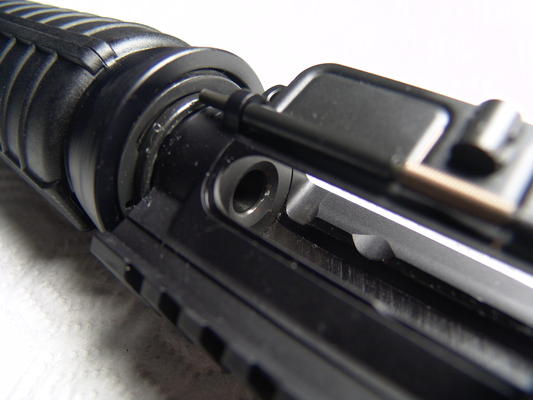 Closeup on the rear of the 9mm barrel. The recesses mentioned above are visible on the interior left side of this upper.
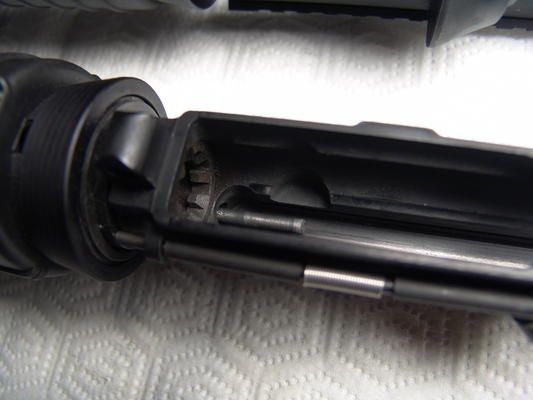 An underneath shot of the 223 upper, showing the gas impingement system's gas tube. Notice the scalloped out part immediately to the left of (above, in the picture) the gas tube. This is present on the 9mm as well.
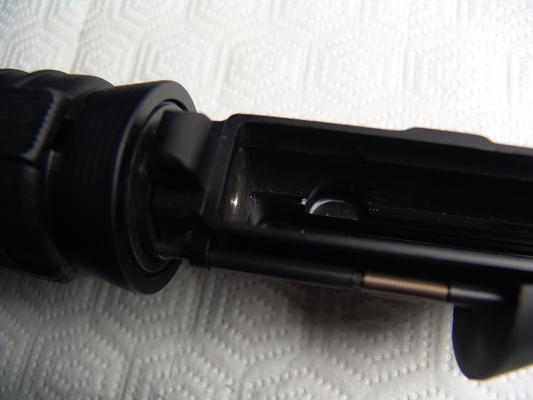 An underneath shot of the 9mm upper. The 9mm bolt has no rotating cam pin, but the upper still has the scalloped relief cut for one.
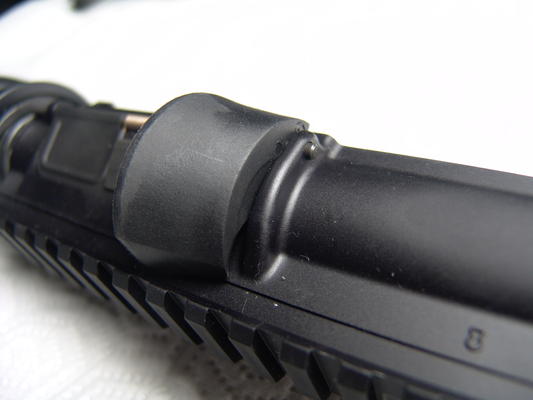 Closeup on the 9mm upper's polymer gas deflector. It's spring loaded, for no reason I can discern.
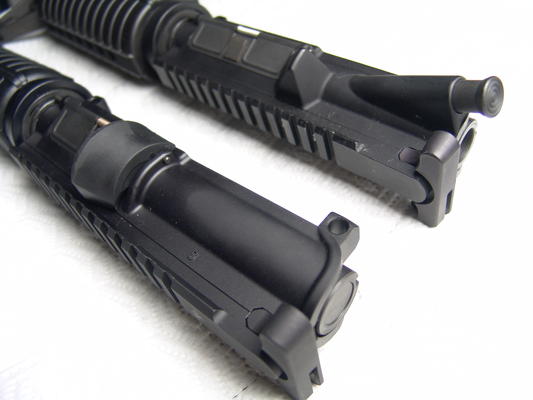 The two uppers, side by side. Notice the 223's built-in integrated brass deflector and forward assist protruding from the right side of the 223 upper (rear).
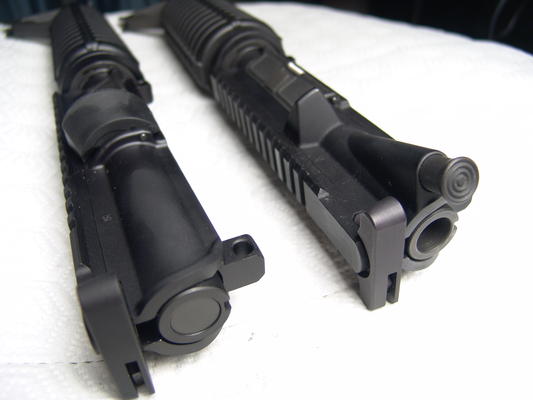 Both uppers, from the rear, with bolt carriers installed.
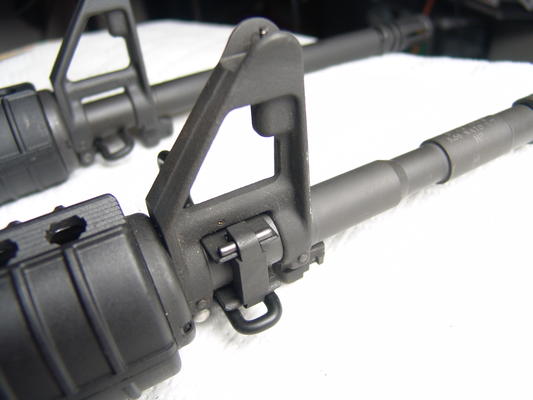 Both of the front sight bases. Notice the small roll pin hole mid-way through the bottom strut of the front sight post in the foreground? The presence of a roll pin indicates that it's holding a gas tube in place, which clearly indicates that this is the 223 version.
-- SeanNewton - 18 Sep 2008 Thanks to Gregory Ruiz-Ade for pointing out what one of the relief cuts in the uppers was for (in order to enable to bolt assembly's cam pin to rotate).


| I | Attachment | History | Action | Size | Date | Who | Comment |
|---|---|---|---|---|---|---|---|
| |
s_Bolts04614.jpg | r1 | manage | 25.4 K | 18 Sep 2008 - 01:09 | UnknownUser | |
| |
s_Bolts04615.jpg | r1 | manage | 20.9 K | 18 Sep 2008 - 01:09 | UnknownUser | |
| |
s_Bolts04616.jpg | r1 | manage | 29.5 K | 18 Sep 2008 - 01:09 | UnknownUser | |
| |
s_Bolts04617.jpg | r1 | manage | 26.2 K | 18 Sep 2008 - 01:09 | UnknownUser | |
| |
s_Bolts04618.jpg | r1 | manage | 23.1 K | 18 Sep 2008 - 01:09 | UnknownUser | |
| |
s_Bolts04619.jpg | r1 | manage | 27.6 K | 18 Sep 2008 - 01:09 | UnknownUser | |
| |
s_Bolts04620.jpg | r1 | manage | 19.1 K | 18 Sep 2008 - 01:09 | UnknownUser | |
| |
s_Bolts04621.jpg | r1 | manage | 14.1 K | 18 Sep 2008 - 01:09 | UnknownUser | |
| |
s_Bolts04623.jpg | r1 | manage | 17.5 K | 18 Sep 2008 - 01:09 | UnknownUser | |
| |
s_Bolts04624.jpg | r1 | manage | 32.5 K | 18 Sep 2008 - 01:09 | UnknownUser | |
| |
s_Bolts04626.jpg | r1 | manage | 29.2 K | 18 Sep 2008 - 01:09 | UnknownUser | |
| |
s_Bolts04627.jpg | r1 | manage | 27.1 K | 18 Sep 2008 - 01:09 | UnknownUser | |
| |
s_Bolts04631.jpg | r1 | manage | 30.5 K | 18 Sep 2008 - 01:09 | UnknownUser | |
| |
s_Bolts04633.jpg | r1 | manage | 29.4 K | 18 Sep 2008 - 01:09 | UnknownUser | |
| |
s_Bolts04635.jpg | r1 | manage | 25.8 K | 18 Sep 2008 - 01:09 | UnknownUser | |
| |
s_Bolts04636.jpg | r1 | manage | 24.9 K | 18 Sep 2008 - 01:09 | UnknownUser | |
| |
s_Bolts04637.jpg | r1 | manage | 24.4 K | 18 Sep 2008 - 01:09 | UnknownUser | |
| |
s_Bolts04638.jpg | r1 | manage | 22.2 K | 18 Sep 2008 - 01:09 | UnknownUser | |
| |
s_Bolts04641.jpg | r1 | manage | 21.6 K | 18 Sep 2008 - 01:09 | UnknownUser | |
| |
s_Bolts04642.jpg | r1 | manage | 23.8 K | 18 Sep 2008 - 01:09 | UnknownUser | |
| |
s_Bolts04645.jpg | r1 | manage | 26.4 K | 18 Sep 2008 - 01:09 | UnknownUser | |
| |
s_Bolts04647.jpg | r1 | manage | 21.1 K | 18 Sep 2008 - 01:09 | UnknownUser | |
| |
s_Bolts04650.jpg | r1 | manage | 19.5 K | 18 Sep 2008 - 01:09 | UnknownUser | |
| |
s_Bolts04651.jpg | r1 | manage | 19.3 K | 18 Sep 2008 - 01:09 | UnknownUser | |
| |
s_Bolts04652.jpg | r1 | manage | 15.4 K | 18 Sep 2008 - 01:09 | UnknownUser | |
| |
s_Bolts04655.jpg | r1 | manage | 16.5 K | 18 Sep 2008 - 01:09 | UnknownUser | |
| |
s_Bolts04656.jpg | r1 | manage | 15.0 K | 18 Sep 2008 - 01:09 | UnknownUser | |
| |
s_Bolts04658.jpg | r1 | manage | 14.1 K | 18 Sep 2008 - 01:09 | UnknownUser | |
| |
s_Bolts04659.jpg | r1 | manage | 13.6 K | 18 Sep 2008 - 01:09 | UnknownUser | |
| |
s_Bolts04660.jpg | r1 | manage | 11.9 K | 18 Sep 2008 - 01:09 | UnknownUser | |
| |
s_Bolts04661.jpg | r1 | manage | 17.7 K | 18 Sep 2008 - 01:09 | UnknownUser | |
| |
s_Bolts04663.jpg | r1 | manage | 15.1 K | 18 Sep 2008 - 01:09 | UnknownUser | |
| |
s_Bolts04664.jpg | r1 | manage | 18.7 K | 18 Sep 2008 - 01:09 | UnknownUser | |
| |
s_Bolts04667.jpg | r1 | manage | 18.6 K | 18 Sep 2008 - 01:09 | UnknownUser | |
| |
s_HahnMagblock04552.jpg | r1 | manage | 26.0 K | 18 Sep 2008 - 01:08 | UnknownUser | |
| |
s_HahnMagblock04556.jpg | r1 | manage | 20.7 K | 18 Sep 2008 - 01:08 | UnknownUser | |
| |
s_HahnMagblock04558.jpg | r1 | manage | 14.3 K | 18 Sep 2008 - 01:08 | UnknownUser | |
| |
s_HahnMagblock04568.jpg | r1 | manage | 17.4 K | 18 Sep 2008 - 01:08 | UnknownUser | |
| |
s_HahnMagblock04570.jpg | r1 | manage | 21.5 K | 18 Sep 2008 - 01:08 | UnknownUser | |
| |
s_HahnMagblock04572.jpg | r1 | manage | 17.9 K | 18 Sep 2008 - 01:08 | UnknownUser | |
| |
s_HahnMagblock04603.jpg | r1 | manage | 17.3 K | 18 Sep 2008 - 01:08 | UnknownUser | |
| |
s_HahnMagblock04605.jpg | r1 | manage | 23.5 K | 18 Sep 2008 - 01:08 | UnknownUser | |
| |
s_HahnMagblock04611.jpg | r1 | manage | 16.3 K | 18 Sep 2008 - 01:08 | UnknownUser | |
| |
s_HahnMagblock04613.jpg | r1 | manage | 15.0 K | 18 Sep 2008 - 01:08 | UnknownUser | |
| |
s_Rear-dsc04578.jpg | r1 | manage | 15.5 K | 18 Sep 2008 - 01:08 | UnknownUser | |
| |
s_Right-dsc04580.jpg | r1 | manage | 17.6 K | 18 Sep 2008 - 01:08 | UnknownUser | |
| |
s_Right-dsc04581.jpg | r1 | manage | 20.2 K | 18 Sep 2008 - 01:08 | UnknownUser | |
| |
s_Right-dsc04585.jpg | r1 | manage | 22.0 K | 18 Sep 2008 - 01:08 | UnknownUser | |
| |
s_Right-dsc04588.jpg | r1 | manage | 23.8 K | 18 Sep 2008 - 01:08 | UnknownUser | |
| |
s_Top-dsc04576.jpg | r1 | manage | 20.9 K | 18 Sep 2008 - 01:08 | UnknownUser | |
| |
s_Top-dsc04577.jpg | r1 | manage | 13.3 K | 18 Sep 2008 - 01:08 | UnknownUser | |
| |
s_Under-dsc04583.jpg | r1 | manage | 19.1 K | 18 Sep 2008 - 01:08 | UnknownUser | |
| |
s_Under-dsc04589.jpg | r1 | manage | 20.1 K | 18 Sep 2008 - 02:03 | UnknownUser | |
| |
s_UpperComparison04574.jpg | r1 | manage | 29.4 K | 18 Sep 2008 - 01:08 | UnknownUser | |
| |
s_UpperComparison04575.jpg | r1 | manage | 21.7 K | 18 Sep 2008 - 01:08 | UnknownUser | |
| |
s_UpperComparison04673.jpg | r1 | manage | 29.7 K | 18 Sep 2008 - 01:08 | UnknownUser | |
| |
s_UpperComparison04675.jpg | r1 | manage | 31.4 K | 18 Sep 2008 - 01:08 | UnknownUser | |
| |
s_UpperComparison04677.jpg | r1 | manage | 24.9 K | 18 Sep 2008 - 01:08 | UnknownUser | |
| |
s_UpperComparison04678.jpg | r1 | manage | 22.7 K | 18 Sep 2008 - 01:08 | UnknownUser | |
| |
s_UpperComparison04679.jpg | r1 | manage | 19.2 K | 18 Sep 2008 - 01:08 | UnknownUser | |
| |
s_UpperComparison04680.jpg | r1 | manage | 17.8 K | 18 Sep 2008 - 01:08 | UnknownUser | |
| |
s_UpperComparison04681.jpg | r1 | manage | 21.4 K | 18 Sep 2008 - 01:08 | UnknownUser | |
| |
s_UpperComparison04682.jpg | r1 | manage | 19.8 K | 18 Sep 2008 - 01:08 | UnknownUser | |
| |
s_UpperComparison04684.jpg | r1 | manage | 21.5 K | 18 Sep 2008 - 01:08 | UnknownUser | |
| |
s_dsc04591.jpg | r1 | manage | 21.5 K | 18 Sep 2008 - 01:08 | UnknownUser | |
| |
s_dsc04592.jpg | r1 | manage | 27.3 K | 18 Sep 2008 - 01:08 | UnknownUser | |
| |
s_dsc04593.jpg | r1 | manage | 25.3 K | 18 Sep 2008 - 01:08 | UnknownUser | |
| |
s_dsc04595.jpg | r1 | manage | 15.5 K | 18 Sep 2008 - 01:08 | UnknownUser | |
| |
s_dsc04596.jpg | r1 | manage | 12.3 K | 18 Sep 2008 - 01:08 | UnknownUser | |
| |
s_dsc04597.jpg | r1 | manage | 14.5 K | 18 Sep 2008 - 01:08 | UnknownUser | |
| |
s_dsc04598.jpg | r1 | manage | 21.1 K | 18 Sep 2008 - 01:08 | UnknownUser | |
| |
s_dsc04599.jpg | r1 | manage | 12.1 K | 18 Sep 2008 - 01:08 | UnknownUser | |
| |
s_dsc04672.jpg | r1 | manage | 21.0 K | 18 Sep 2008 - 01:08 | UnknownUser | |
| |
s_dsc04685.jpg | r1 | manage | 22.0 K | 18 Sep 2008 - 01:08 | UnknownUser |
This topic: Gunwiki > WebHome > ArticleIndexByGun > RefArFamily > AnalysisAR9mmRRA
Topic revision: r7 - 03 Dec 2013 - SeanNewton
Ideas, requests, problems regarding TWiki? Send feedback